21 UE4/UE5 Tips To Help You Build Out Levels Faster
Today, I wanted to share some of the most useful Unreal Engine tips and tricks I’ve found for helping build out levels.
Getting content into your levels can be very time-consuming, and I’ve spent a bunch of time in my own solo side projects doing it. I love techniques that can help speed things up, reduce clicks and generally make the whole process more straightforward. Here is a list of those tips and tricks I’ve found that I think are worth knowing.
I grouped them under three topics:
Assets Placed In The Level - Tips to help you interact with assets placed in a level
Asset Managing/Filtering - Tips to help you pick/find the assets you are looking for more quickly
Working With The Editor Viewport - Tips to help you work more fluidly with the editor viewport
Give me a follow on Twitter or sub on YouTube if you like what I do and want to know when I release new Unreal Engine tips!
DID YOU KNOW YOU CAN…

Why Useful:
This technique is by far one of the ones I use most often. Select an asset in-level and press the End key on your keyboard. This will align the asset flush with any surface directly below it. Check out my video or blog post to see it in action and find out a bit more info on it.
#02 - Snap To Surface
SEE HOW ON YOUTUBE - READ HOW BLOGPOST

Why Useful:
When you first drag an asset out from the content browser, you will notice that it snaps to surfaces. However, anytime you move it after that it doesn’t have this functionality anymore, as the setting is off by default. You can activate/deactivate it via the buttons in the top right of your viewport, look for the Surface Snapping option under the translation settings. Take a look at my video or the blog post for a true breakdown of how to do this. Once activated you can more again more easily align assets to surfaces, great for putting assets onto tables etc
#03 - Move With Asset
SEE HOW ON YOUTUBE - READ HOW BLOGPOST

Why Useful:
If you Hold Shift as you move an asset, your camera will move alongside it. This is something I find a lot of people don’t know about but it’s super useful, especially when moving something over larger distances. It’s a lot more fluid method, instead of moving an asset a bit, repositioning the camera, moving it a bit more, having to reposition the camera again etc.
#04 - Select All Of The Same Type
SEE HOW ON YOUTUBE - READ HOW BLOGPOST

Why Useful:
If while you have an asset selected in your level you Hold Shift and Press E, you will select all assets of the same type in the level. This can come in handy when you don’t want to affect your assets globally by changing settings in the asset viewer version (its defaults) but instead want to make changes locally in the level itself. An example of this could be changing the lighting channels of a specific asset to make them stand out more across your entire level. Check out my video or the blog post for more details.
#05 - Temporarily Change Pivot
SEE HOW ON YOUTUBE - READ HOW BLOGPOST

Why Useful:
This is super helpful when building out your levels, allowing you to more easily manipulate your assets. If you right-click on an asset go down to Pivot - > Set Pivot Offset Here it allows you to move the pivot location. Check out the links above for more details.
#06 - Mirror Asset
SEE HOW ON YOUTUBE - READ HOW BLOGPOST
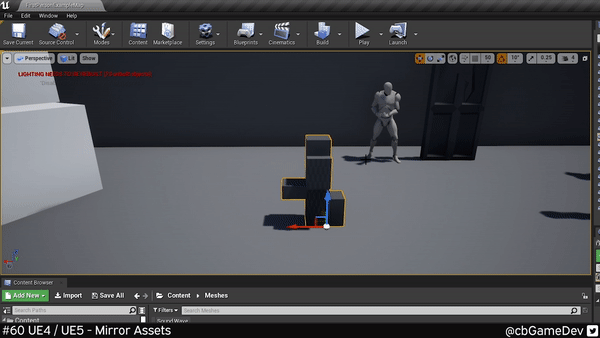
Why Useful:
This is really useful for helping get the most out of your modular kits. It’s really easy to do, Right-click on an asset in your level and head down to Transform. Then you will see the options to Mirror X, Mirror Y and Mirror Z. You can also tie this functionality to keybindings, as I have in the GIF below, check out the video and blog links to get more info on how to do that.
#07 - Lock In Place
SEE HOW ON YOUTUBE - READ HOW BLOGPOST

Why Useful:
This can be great if you have some important assets in your level that you don’t want to accidentally move. It’s really simple to do, Right-click an asset in your level, then head down to Transform and click on the Lock Actor Movement option.
Asset Managing/Filtering
#08 - Advanced Content Browser Searching
SEE HOW ON YOUTUBE - READ HOW BLOGPOST

Why Useful:
This is useful in a bunch of ways. Firstly it can help you find assets more quickly as you can use more advanced syntax to help narrow down your searches (see my video or blogpost to learn more). You can also use it for other things such as helping find assets that could do with optimising (e.g. list assets with more than X amount of triangles) or finding problems (e.g. assets with no collision).
#09 - Content Browser Filters
SEE HOW ON YOUTUBE - READ HOW BLOGPOST

Why Useful:
I find this particularly useful when I can’t remember what something is called or where it is in your project, but you know the asset type. It’s easy to do, just hit that Filters button and pick what types you want to filter by. 2 I tend to use quite a lot are Checked Out (for source control) and Show Redirectors. Check out the links for more in-depth info.
#10 - Multiple Content Browsers
SEE HOW ON YOUTUBE - READ HOW BLOGPOST

Why Useful:
This is one of those little tips which can be really useful and help speed things up a lot when you are building out a level. As you can see in my GIF below I can quickly grab out meshes from one content browser and then drag out and apply materials from a different content browser. You can have a maximum of 4 content browsers open at one time!
#11 - Thumbnail Edit Mode
SEE HOW ON YOUTUBE - READ HOW BLOGPOST

Why Useful:
Unreal normally does a pretty good job but sometimes you just want to rotate a thumbnail preview a little bit so you can see it from a slightly better angle. Something which can be especially useful when your icons are small. In your content browser look for the View Options button and then Thumbnail Edit Mode. Check out the links for more details on how it works.
#12 - Content Browser Icon Size
SEE HOW ON YOUTUBE - READ HOW BLOGPOST

Why Useful:
I find this useful when looking for a specific asset. I will scale up the icons to help quickly find the one I am looking for. It is also useful if you are looking for props to help fill out a scene as scaling the icons up lets you better gauge what assets might fit the current scene well.
#13 - Favourite Folders
SEE HOW ON YOUTUBE - READ HOW BLOGPOST
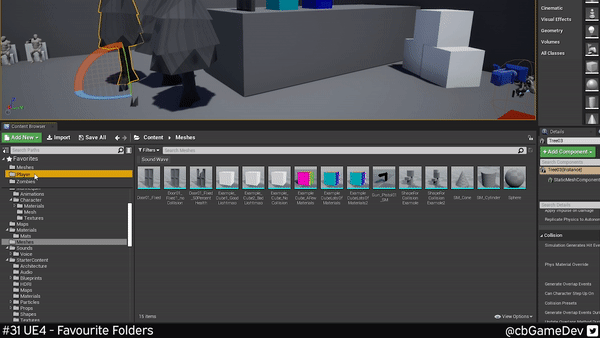
Why Useful:
This is a really useful technique if the assets you are working with are spread out across your project and you find yourself constantly switching between folders. It’s really simple all you need to do is Right-click On A Folder and click on the Add To Favourites option. Your folder will then appear in a new area of your content browser, the Favourites Area. It doesn’t actually move your folder it simply adds a shortcut to it. Check out my links for a proper breakdown of how it works.
#14 - Outline Filtering
SEE HOW ON YOUTUBE - READ HOW BLOGPOST
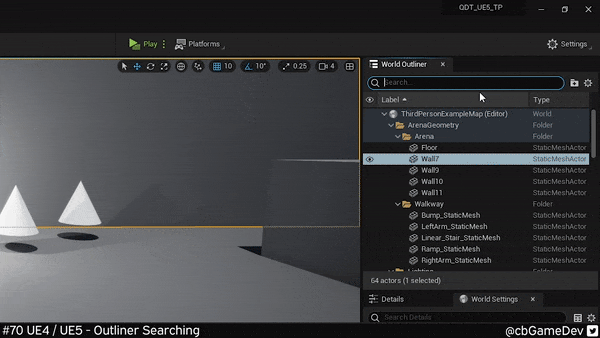
Why Useful:
This is really useful if you have a busy scene with lots of assets and are having trouble finding certain things quickly. You probably knew, you could search for specific names e.g. light but did you know you can use a minus to exclude words e.g. -point, this would show you a list of all lights in the level but not show you the point lights. I find this very handy.
Working With The Editor Viewport
#15 - Quick Adjust Camera Speed
SEE HOW ON YOUTUBE - READ HOW BLOGPOST

Why Useful:
Normally I see people changing their camera speed by going up to the top right of the viewport and changing the slider under the camera icon button. A much faster and more fluid way of doing it is by using your mouse wheel. While moving around your viewport if you roll your mouse wheel backward you will slow the camera movement down and if you roll your mouse wheel forwards while moving you will speed up the camera movement.
#16 - Toggle Translucent Selection
SEE HOW ON YOUTUBE - READ HOW BLOGPOST
Why Useful:
This is a great little tip, that I use a lot. A pretty common problem when building out levels is that translucent materials (glass, water, effects etc) can block your ability to select objects in your scene. However, you can use the keyboard shortcut T to toggle Allow Translucent Selection. This lets you ignore those translucent materials and select the object you wanted to get at.
#17 - Fullscreen Viewport
SEE HOW ON YOUTUBE - READ HOW BLOGPOST

Why Useful:
You can quickly toggle full-screen viewport by pressing F11. This is particularly useful when you don’t need to access any settings or add new items you are instead just moving stuff around with the gizmo (translating, rotating, scaling). Having a fullscreen view just makes it a bit easier to see what you are working with!
#18 - Adjust Gizmo Size
SEE HOW ON YOUTUBE - READ HOW BLOGPOST

Why Useful:
The gizmo can sometimes block your view and you can quickly reduce its size so you can see your scene better (Hold Alt and press [ ). The opposite problem can also happen, you can be working at a distance and the gizmo is too small and fiddly to select in which case you can increase its size to make it easier to click (Hold Alt and Press ] ).
#19 - Custom Grid Snap
SEE HOW ON YOUTUBE - READ HOW BLOGPOST
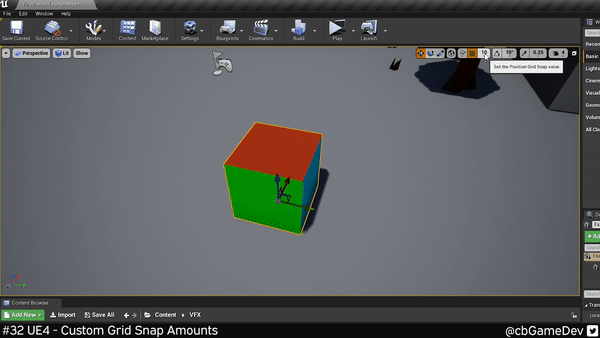
Why Useful:
You might already know about grid snapping (activatable via the top right buttons in the viewport), but you can take it a little further by adding your own values to the grid snapping. This is great because it means you can make it work with whatever dimensions your modular kits need. There are a few steps to do this, so its best to check out my video or blog link above. But broadly speaking go to your Editor Preferences then search for grid and you will find the settings you need to play with.
#20 - Stored Camera Positions
SEE HOW ON YOUTUBE - READ HOW BLOGPOST

Why Useful:
This is great for people building out levels /dioramas, who need to repeatedly check how their scene looks from specific angles. The proper word for this would be Camera Bookmarks. Check out the video or blog to see in more detail how it works. But for a quick overview you can use keyboard shortcuts to store camera views (Hold Ctrl + any number key). You can then load these camera views by pressing your number keys on your keyboard.
#21 - Quick Change Viewport Angle
SEE HOW ON YOUTUBE - READ HOW BLOGPOST

Why Useful:
This is a much quicker way to switch viewport angles, as you can see in the GIF below, as you don’t need to click through the menus. This is a much more fluid way that allows you to stay in the flow of working. It’s easier to understand when you see it explained so make sure to check out my video link above to get a proper breakdown of how it works. To do it HOLD CTRL on your keyboard and then press and HOLD MIDDLE MOUSE BUTTON, this creates a thin line from your start point, to where the mouse ends. Then when you RELEASE THE MIDDLE MOUSE BUTTON, depending on which direction your mouse is from the start position, you will switch to a different viewport angle:
Release Top = Orthagraphic Top View
Release Bottom = Orthagraphic Bottom View
Release Left = Orthagraphic Back View
Release Right = Orthagraphic Front View
Release Top Left = Orthagraphic Right View
Release Top Right = Orthagraphic Left View
Release Bottom Right = Perspective View