QUICK DEV TIP #97 UE4 / UE5 - Screenshots
Here is something that’s always useful to know about!
Did you know there are multiple ways to take screenshots in Unreal?
If you would prefer to watch my video version, check it out here
There are a bunch of different ways to do this. The first is taking a standard screenshot by pressing F9 whilst you are in your viewport.

After pressing the key look to the bottom right of your screen and you will see a little popup appear, which means it took a screenshot successfully.
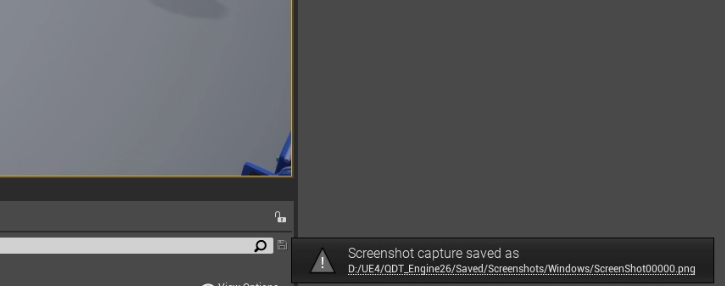
On the popup there is the file path of where the screenshot was saved. Clicking on the file path text will open the folder location. This is a very useful way to quickly get to the screenshot.

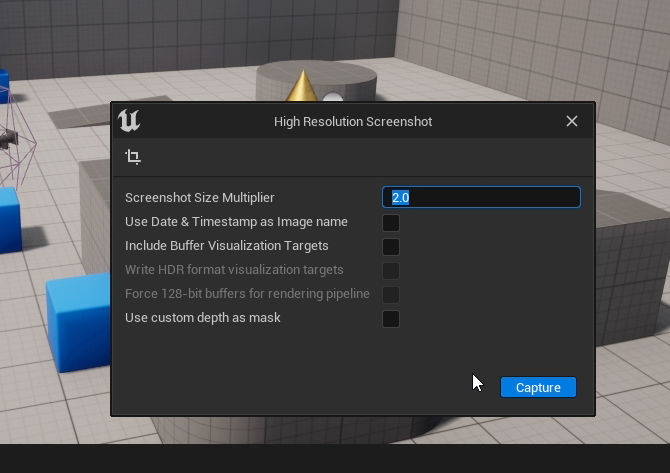
The second way to take a screenshot which gives you a lot more control is to go up to the top left of your viewport, click the little drop down, and then click on High Resolution Screenshot…
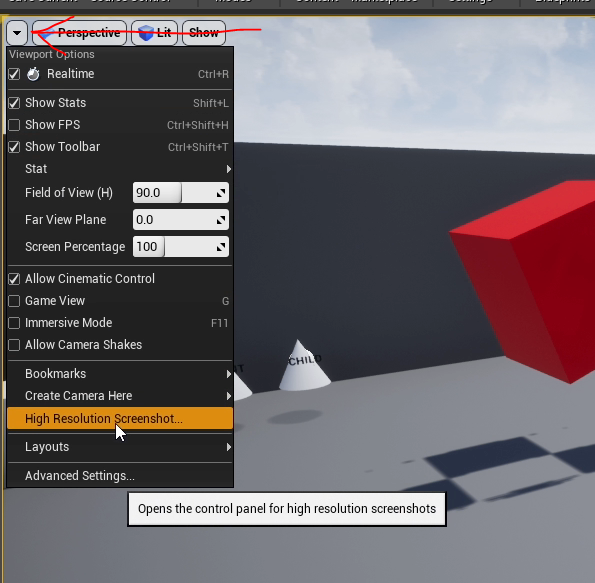
This will open a new window in the center of your viewport, with a few options to play with.

You can take a screenshot of your viewport by clicking the button with the camera in the bottom right. This will then show the same popup in the bottom right of your editor, which you can use to quick navigate to the images.

A setting that is useful to know about here is the Screenshot Size Multiplier (the slider at the top). This will multiply the resolution of the screenshot. So 2 would be x2, 3 would be x3 etc. If you notice below there is a warning about this because if you go too high can become intensive and can cause your computer to stall or even crash.
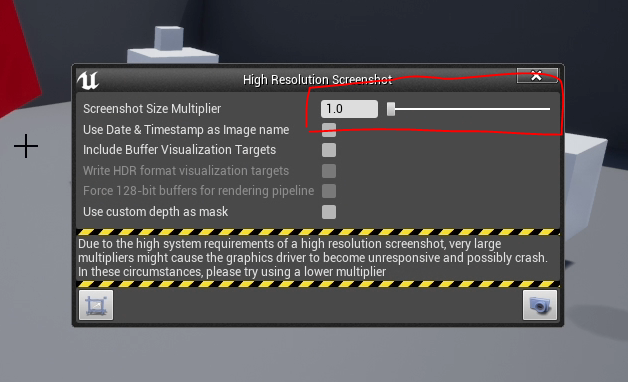
Another useful part of this method is that we can crop our selection before we take a photo by using the button in the bottom left hand side of the High Resolution Screenshot window.
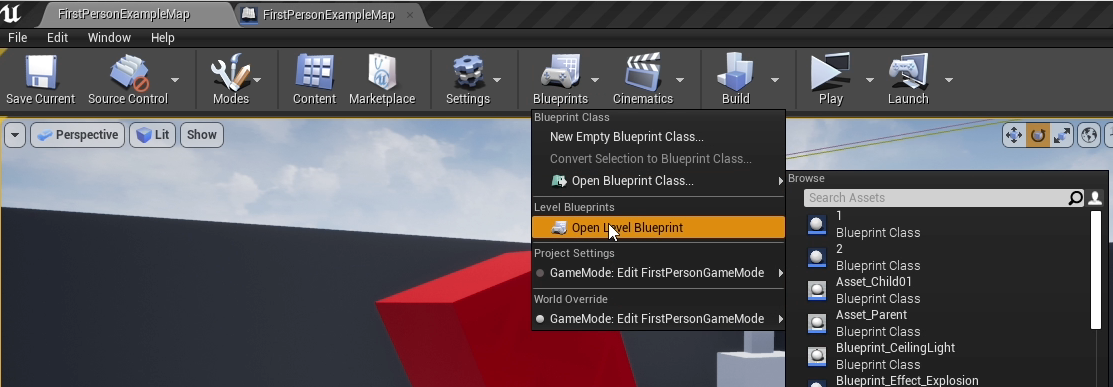
The third way is to use a console command, which can be useful for taking screenshots while we are playing. There are lots of places you could set this up but in my example, I’m doing it in the level blueprint. So open up your level blueprint by clicking on blueprint in your top bar then Open Level Blueprint.
Inside the level blueprint, we can setup a few nodes to create what we need. Basically, when the space bar is pressed I do a print and then the important bit I made an Execute Console Command blueprint node and put in the command HighResShot 2. The number on the end acts like the Screenshot Size Multiplier we saw in previous examples. Again don’t go too high but increasing this with give you better quality image.

If we now play in editor, every time we press the space bar we will take a screenshot. One thing to notice here is that you don’t get the UI in your screenshots.

So this is pretty much exactly the same in Unreal Engine 5. F9 for a standard screenshot still works. The High Resolution Screenshot window is still accessible in the same way (although it looks slightly different UI-wise)
We can also run the same console command as well. I’ll show this in a slightly different way in UE5. Below I play in editor then I open up the console while playing and use HighResShot 2 to trigger a screenshot.

So there are a bunch of different ways to take screenshots but the ways I use most often are using the High-Resolution Screenshot window for most control (accessible via the top left of your editor viewport) and then using a console command via a key input to capture more gameplay based screenshots! These are great ways to help get nice shots of your game.
Want to know when I release new quick Unreal tips & tricks?
Enjoyed this? Check out my other work: