Rage Postmortem
RAGE POSTMORTEM
I’m James, an indie game developer (@cbGameDev). I make bigger games with my friends, in a studio I helped start up and make smaller games on my own in my spare time! I enjoy the challenge of working in a team on big scale games and use the smaller games to learn, have some fun and stay motivated through shorter development cycles. This is a postmortem about making “Rage”, I thought it could be interesting to others and useful for myself to reflect on the process.
View the games itch.io page here!
WHAT IS RAGE?
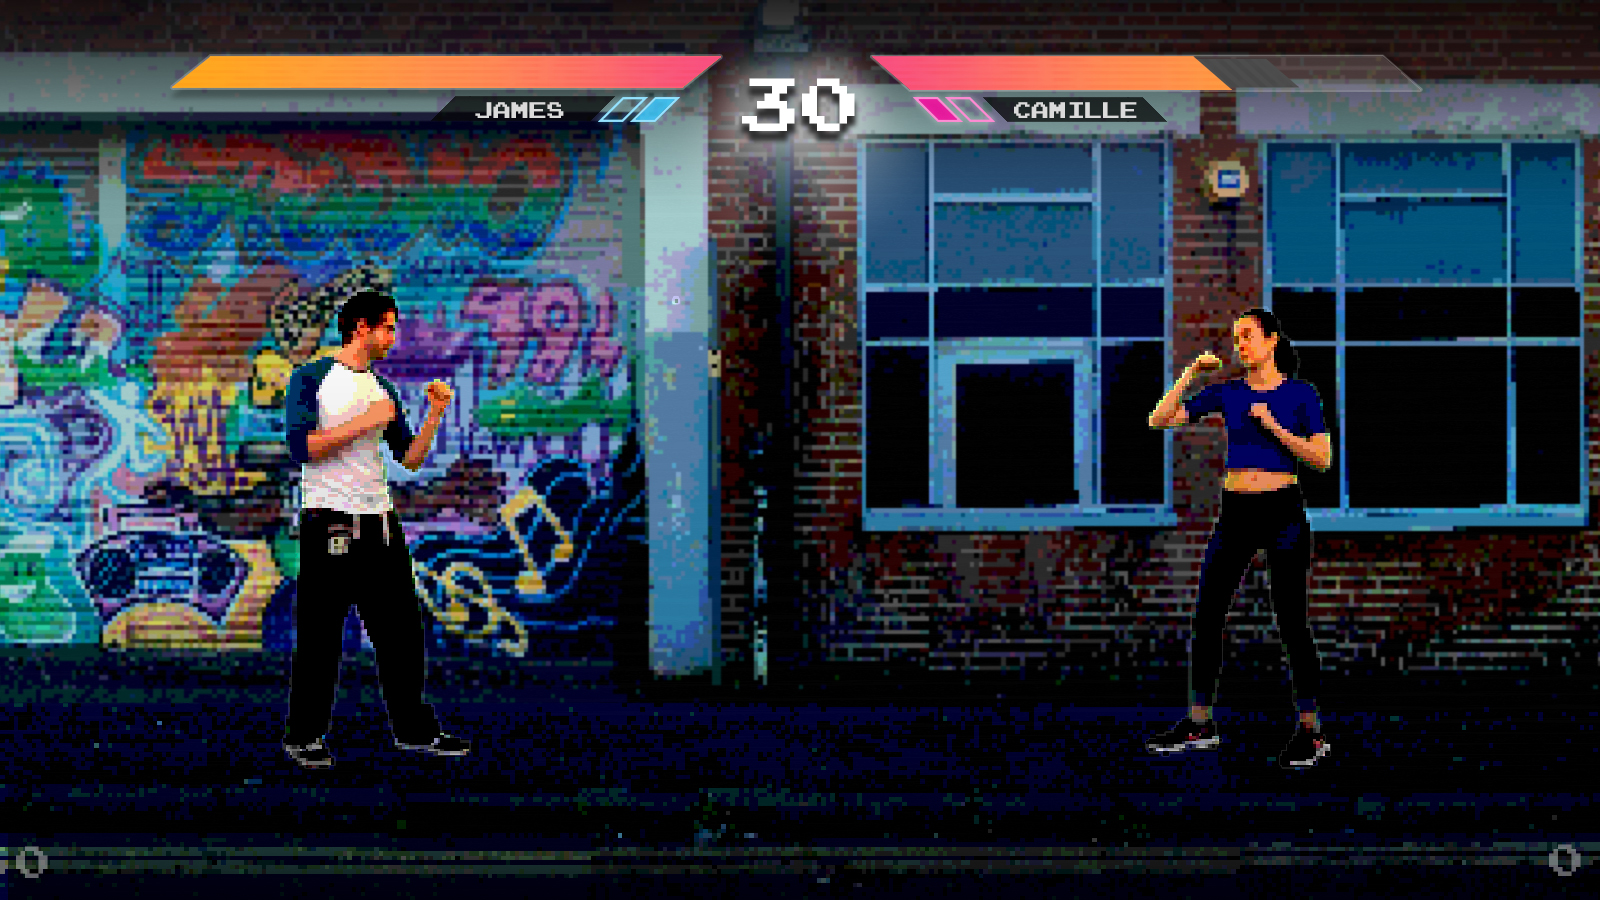
Rage is an 80s style beat-em-up, inspired by Street Fighter, Marvel Vs Capcom and Mortal Kombat. It has a single-player game mode in which you play against AI, unlocking new playable characters as well as a Player Vs Player game mode. The characters in the game are made up of me and my mates.

WHY MAKE THIS GAME?
Before I started Rage I knew little about the mechanics of fighting games. At that time we had started playing a lot of Marvel Vs Capcom in the office and I was interested in how the game seemed simple on the surface but was hiding lots of complexities behind the scenes. I thought it would be a good challenge to try to make my own fighting game and I wanted to have me and my mates as the characters in it. Below is my initial rough idea:

MOTIVATION
The highs and the lows
Originally I planned to make Rage in my evenings over three months, keeping to my short dev cycle…...but this didn’t happen. Instead, the game took close to six months due to a mix of expanding the game's features, a time-consuming art style as well as being busy with big updates at the office. Many times I was tempted to stop working on the game; I didn’t like it anymore, it was taking too long or I wanted to start a new and exciting idea instead. However, my personal philosophy is to stick to it until the end, as finishing a game itself is a skill that needs to be worked on and now I am glad that I did push through to finish it. This tweet was posted by @GameDevLeague, while I was making Rage and sums up perfectly how I feel.

During a project, I write down all the other new ideas I have and while I continue to develop that project, a sort of game ideas natural selection happens. I end up dropping some ideas, others mature and some join together to create new ideas, leaving me with more interesting more refined ideas.
Below are gifs from the different builds I cooked off, showing the game's progression:


GAMEPLAY
Early on I found the video Concepts Every 2D Fighting Game Player Should Know by YouTuber GuileWinQuote. This was really useful to help me understand the mechanics of fighting games. I thought it was important to understand them if I didn’t include them all. Modern fighting games are getting more and more complex behind the scenes, they look and feel great but replicating this by myself would have taken far longer than I wanted. Instead, I chose to make the gameplay in Rage a more realistic street fighting style, no double jumps, flying or super fancy specials. This worked well with the 80’s theme and meant that it would not be too complex to develop. I thought having a single punch and kick would give too little variety to make the combat interesting. So I created a simple combo system to add a layer of complexity; with fast light attacks, normal attacks and slow heavy attacks. I carried this across to the three attack types I had; punches, kicks and crouching punches. The player also had a single special move. This took each character's attack move count from 2 to 10, each with their own speed and damage. I talk about the technical side of this in the Code/Blueprint section later on.

Responsiveness is key
One of the key things I learnt from making the combat was that responsiveness is key. As soon as the player touches a button the character needs to begin their attack. It is the same for when a character returns to their idle pose after a move has finished, they need to snap back quickly else it will feel unresponsive. There is little time for anticipation in the initial build up or for overlap on returning to idle. To give other players opportunities to attack, I would pause the character at the end of their swing for a fraction of time, before the return to idle begins, almost as if a cooldown. This seemed to work, making players feel as if it was their fault if they got hit, rather than the game being unresponsive.
Expanding gameplay features
Initially, I was only going to make a player Vs player game mode but early on in development it felt like some sort of overarching progression was missing, so I decided to add in a single-player tournament mode. I locked the PVP mode and all but one character, instead players would have to unlock them by completing tournaments (as Super Smash Bros does). This felt much better, giving a challenge to overcome but at the same it time increased my workload as I then needed Ai, new UI and a progress saving system.
Balancing
Balancing the game took time as there were a lot of values to play with across multiple characters. There were simple things such as health, speed as well as more fiddly elements such as the number of frames, damage and playrate for each individual move. Even small frame addition/subtraction seemed to have a big influence on responsiveness and ease of attacking. I tried to start balancing the game early on as I thought it would be a very iterative process, taking time to find good values that worked. As testing was the only real way to gauge if tweaks to values were making a positive impact on the gameplay, I tried to test/balancing each time I opened up the editor to work on the game. I would make notes then make changes and then play again with those changes. Another really useful method was to ask my friends to play it while I took a step back and made notes. This helped to not only refine the UI and flow of the game but for balancing it allowed me to see flaws in the combat; over powered/underpowered moves, dodgy collision, damage trace problems etc. For balancing the AI, I kept their health, speed and moves exactly the same as their player counterpart. Instead, I balanced them through their difficulty settings which you can read about later on.
ART
I knew I wanted to have an 80s theme from the get-go and I also thought this would be a great opportunity to try using photos/images of my friends and treating them in photoshop to create 2D characters sprites (a style I had wanted to try for a while). This also allowed me to play with a slightly choppy animation style. When first thinking about the art of the game, I gathered a few images to use as key reference. This art summed up the direction that I wanted to go, in terms of colour palette, shape language etc, which you can see below:

General game look
Initially, I placeholdered all art (from characters to UI) while concentrating on the game mechanics. However, when the mechanics were more solidified, I returned to thinking about the visuals. I decided to make a style sheet and a visual gameplay mockup to help keep/consolidate the art direction that I wanted to follow. After gathering more reference images I set about trying to create something. I found this tough, especially the colour choices (as I’m colourblind), but I pulled something together which I thought would work well. This is the first time on a personal project I did this and it really helped, especially later on when it came to adding new unplanned UI elements. I will definitely do this from now on as soon as I know the game mechanics will work. Below are the style sheet and the gameplay mockup:

Character sprites
Rage’s game flow and mechanics were completed relatively quickly, however, the art style for the characters is certainly one of the reasons the game took longer than expected. At the end of the project, there were just over 3,500 character sprites (including background characters). With each main character having 40 actions/moves; walk forward, jumping, hit reacts, combat moves etc. Even with a green screen and Photoshop actions to help automate the process, I still had to hand adjust each texture, which was very time-consuming. I did a test early on trying to decide how pixelated the characters should look. I liked the idea of them being pixelated but at the same time I wanted to be able to make out details, otherwise, there was no point in having me and my friends be the characters. Below are some of the iterations that I went through:

Styling the characters
Here is my end process for the characters:
First I used an iPad on a stand to video record a person doing a movement from a flat angle against a green screen. Then I loaded that video up in Quicktime on my PC and selected a range of frames that I liked, cutting away extra unneeded footage. I then batch exported each frame as a separate image.
After that, I made a new Photoshop file and brought in every fourth frame image (to get the slightly choppy animation style). I then had a pipeline with separate stages as I wanted to make a nondestructive process, in case I needed to revisit/touch up stuff. Firstly I grouped these images into a folder called “Clean”, carefully cropping and deleting, as much of the canvas as possible, to save on hard drive space.
Then the time-consuming part started. I duplicated the clean folder to a ‘Masked’ folder and then from each frame masked out the background. In early placeholder tests (before the green screen), I used the quick select tool, which was a long and arduous process. I ordered a green screen off Amazon and instead used ‘Select-> colour range’ to remove the green from the image. I automated this with a Photoshop action but it still took time. I had to go through each frame afterwards and double check as even a single pixel outside of the characters area would auto generate collision in engine and mess with the gameplay.
Once happy with the masking I duplicated the folder to an ‘Edit’ folder and ran an action to add the crunched 80s style effects. This consisted of:
Adjusting the levels to create greater contrast
Using posterise to reduce the overall amount of colours
Transforming the image to 50% of its size (with nearest neighbour interpolation on)
Then returning it to its original size 200%
After that, I duplicated the group one last time, adjusted the canvas to be a power of 2 (e.g. 512x512) and scaled and positioned the character in the images ready for importing into engine. I also added a low opacity gradient going from the feet to the head, making the feet darker and drawing attention to the characters face. I then exported each frame as a PNG and they were ready for the engine.

Evolution of recording
I adjusted the way I recorded the characters as I progressed through the project. Initially, I recorded footage in my kitchen (1), but this made it very time-consuming to mask out the background so I bought the green screen (2). I then realised that I needed a fixed flat angle and more space to record in, so I borrowed my friend’s iPad stand and changed filming location (3). The green screen was working well but was a touch too short so I got hold of another one to cover the feet area(4). Overall this was a slow iterative process. I wish I had the end setup from the very beginning as it would have saved me so much time and helped to keep everything looking consistent, but live and learn!

Best practices
As I progressed through development I ended up with inconsistencies between characters because I was learning and improving with each character I put in. This can be seen in the differences between Camille’s and Mitch’s characters. Below are some of the core things I learnt:
Use a power of 2 texture size. This will allow you to compress the texture in engine reducing its memory cost dramatically and making the difference between a game running or not at all (In Rage Example being 350kb down to 85kb)
Bring the images in at a good texture size, you can always mip it down in the engine (In Rage I brought images in as 512x512 and mipped them down by 1)
You can set the pivot location in editor per sprite. So if a character's hand goes out of frame, rather than increasing the texture sheet size to fit it, instead move them over in the texture space and use the in engine pivot to line it up with other frames
Make sure there aren't any pixels outside of your character, even a single pixel would get collision, messing with players hit box area (I was auto generating shrink wrap collision per sprite)
My Photoshop actions deleted themselves mid development, so make sure you back them up by saving them to your hard drive (found out this is quite a common problem)
Use a green screen if you are going to mask a large number of images from their background. Also, use a flat angle and try to film under the same lighting setup if you have to split filming into separate sessions
Personally, I found it easier to work in batches. For example, with each character I would Quicktime select and export the frames I wanted, then I would do all the Photoshop work in one and finally do all the engine work in one. This won’t be for everyone but I found I managed to get into more of a workflow like this
CODE/BLUEPRINTS
I used the Unreal Engine 4 for Rage and I wanted to push myself to learn and use C++ instead of only Blueprints. I started off with good intentions, setting up a project from a C++ base and opening the engine but that was about as far as I got, haha. I went to set up key inputs in C++, but I had no idea how to do it, I started searching but gave up shortly after as I knew it would only take two seconds to do in Blueprints. In the end, I stuck to Blueprints and I think it’s a good thing I did otherwise the project would have taken even longer! I’m still adamant that I want to make a game using C++, but I think it will be more of a natural learning curve. For example, I know some localisation functionality can’t be accessed by Blueprints alone so I would have to use C++.
Blueprint Library
A useful new thing I did for this project was utilising the ‘Blueprint Library’ to make a more informative print to screen. Blueprint Library functions can be accessed from any Blueprint. With my game’s more advanced game mechanics I left in prints until the game was closer to being finished (e.g. the combo system). If you forget where the variable value (such as a non-informative float or int value) is coming from it can be annoying to find. So in the Blueprint Library, to save me time from repeatedly making it in different Blueprints I made this simple function, which allows you to give a little bit more context to your prints.


The combo system
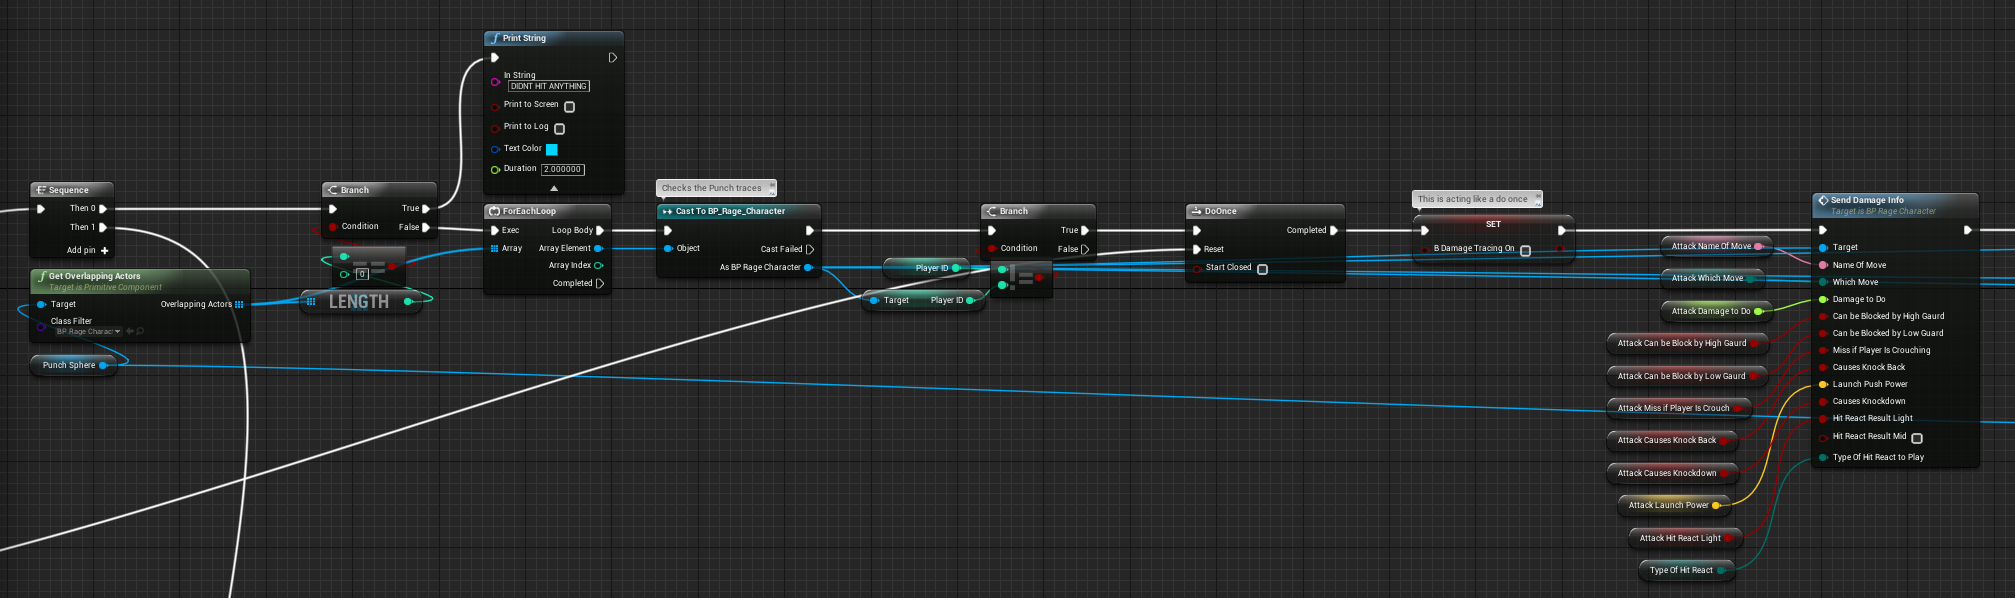
Here is a quick run through of the logic I used to develop the combo system. Before I could perform any moves I needed to know what the actual moves were; which sprite sheet they would trigger, how much damage they would do etc. To do this I created an Object called player_move to store information about each move (see image below). These now hold some redundant information such as “which move” but a lot of it is still relevant such as; “MovesNeededRevers”, “B is crouch move”, “Damage to do” etc. I stored a list of each player's available moves in an array in their respective player characters Blueprint so that I could access it later.

The next step was to find out and record which input the player had pressed. Off each input action, I performed checks to see if an input was allowed, if it was I ran a function to record the input that had been pressed.

This Input Pressed Record function took the input that was fed into it, turned it into a predetermined string value and then added that to an Array of last moves, unless the moves array length was above three. In that case, it would delete the 1st array entry (the oldest move that had been performed). Once this had all been complete I ran a function to determine what move should be performed, if any.

This function was called check move list for attacks and it did exactly what it says on the tin. It would then check the Array of last moves against the list of moves available in the player character. If an entry matched I would pull the information I needed from the move to be used later on, set the sprite to play and activate the damage traces.

I also set a looping function to delete the current move array and current move. This allowed for more responsiveness in the move detection.

For the damage tracing, I had two sockets on the player that followed the punch and the kick motion. These were set individually through the sprite sheets. When the damage traces were activated they would run the function below on tick, until the move was over or they hit the enemy player. Each tick they would check for an overlapping actor of type player_character.If successfully overlapping they would check it was another player (not self) and if it was it would turn tracing off and send the previously stored move data to that other players take damage function. The player who was hit would then calculate their health loss based on if they were blocking, crouching etc. This system definitely has its floors but it seemed to work okay for what I wanted.
AI that fights
I realised if I was going to have a single-player mode I was going to need an AI to fight back. The AI didn’t need to be super complex and I wanted to keep them clean and simple so I decided to keep the logic in the Ai_Character Blueprint instead of using Unreal Engines AI tools (behaviour trees etc). Rather than starting from scratch, I created a child from the main character for the base of the AI. This meant that I could use all the work I had already done in terms of the health logic, sprite playing, combat moves etc.
The AI needed to be constantly aware of what was happening in the fight, regardless of if they actually reacted to it. So firstly I setup a function in the Ai_character, off tick that would check certain variables in the human player: is crouching, is attacking, Location etc (Off tick was greedy but as not much was happening in the scene, I hoped I could get away with it). Later on, I would make use of this information.

External to the ai_character I made an ai_difficulty object, storing float variables which I could use to drive the difficulty e.g. chance to block, chance to move toward or away, chance to taunt etc. The most important value here is the AI thinking speed. An example of the Tournament 1 AI settings:

When the AI spawns in it checks and sets its settings from its assigned ai_difficulty object. Then when its Event Begin Play is triggered it kicks off a looping timed function. I used this as a base level for the AI difficulty. The quicker the timer the faster the AI can think and make decisions; should I block, should I attack etc.

Next, comes the decision making part. When the make decision function is run (from the timed looping function above) the AI calculates the distance to the player and then decides what to do on a case by case basis. I made four distance ranges: punching range, kicking range, far and too far. Each of these has a set of moves that can be carried out, for example too far has either taunt, move forward or do nothing. Whereas at a kicking distance the AI can choose from move forward, backwards, kick or block. Within these different ranges, I used a random float chance to drive bool branches based on the setting from the ai_difficulty object fed in on its creation. I found that with only a handful of variables I was able to create interesting and difficult AI. This system was easy to expand on, as I could just add in another branch check, as I did when I got the AI to perform specials moves.


THINGS THAT DIDNT MAKE IT/DIDNT WORK OUT
The idea with my smaller games is that I use shorter development cycle to stay motivated. Rage was taking a lot longer than I wanted, so in order to get it finished, I decided to drop/not explore some features that I thought could add to the game.
Move buffering
At the moment I clear the player's current move list (list of their most recent inputs) on a regular basis (o.8 of a second). However, even so, there can be slight pauses and a chance to miss players input in-between clears. If I really wanted to make gameplay run smoothly, I would like to look into implementing move buffering: Storing the player's next move during their current move. Move buffering is a common mechanic in fighting games and can be used to great effect to create fluid gameplay.
More advanced AI
In the end, the AI worked out okay. I could get enough variety out of how they fight to make them interesting, nowhere near as interesting as fighting a real player but good enough for this project. If I was to expand on them in the future, I would like to make the AI remember the moves players had made. Then use this information to catch patterns and adapt to how the player fights. E.g if a player repeatedly attacks with one move, using that information to affect the weighting in the AI's decisions as to what attack they should use. However, this would not be simple and it would mean reworking and building upon the system that is in place. For this, I might use Unreal Engines AI tools instead but for now, it is a bigger job than I wanted to do.
Stamina bar
I toiled with the idea of having a recharging stamina bar with each move removing a set amount of stamina. This is something that I have not seen in a fighting game before, instead it is more commonplace in the survival genre. In the end, I decided to leave this idea for another time as the project was already running long and I wasn't sure it would work. As pausing to recharge your stamina bar could break the fluid flow of gameplay.
Cutting attack moves
For each character I actually video recorded a jump kick, jump punch and simple grapple/throw move. In an attempt to finish the game I cut these attack moves as I would have had to implement new systems to get them working. In the future the grapple/throw might be something I think about putting in the game to combat too much blocking E.g. you can successfully grapple and throw if another player is blocking.
Four player mode
I thought it could be interesting to have a tag team style gameplay 2 Vs 2 players game mode, with recharging health when not in the match, like in Marvel vs Capcom. However, I initially built the game with 1 Vs 1 in mind and was going to add in the extra player functionality at a later date. In the end, I dropped this as I left it too late in development meaning I would have to rework a lot of systems, spawning, UI etc. If I had built the game up from day 1 with this 4 player gameplay in mind, it would have been less hassle than reworking a bunch of system at the end of the project.
CONCLUSION
Although my motivation for making this game went up and down, I'm glad that I pushed through to finish it and now I have even more respect for fighting games, especially things like Injustice Gods Among Us 2 which is so fluid and polished. If I was to make the game again I would make sure to use a green screen from day one and I would also think more about the characters' clothing choices, making them more 80s-themed. However, even though I have a good pipeline down now, I would think twice about making a game with this art style again, simply because of its time consuming-ness. Overall I had fun, learnt a lot, my friends at the office enjoyed the game and I hope other people will do too.
On to the next game!
BLOG POSTS
-
2026
7
- Apr 15, 2026 My Tools Are 30% Off This Week!
- Apr 4, 2026 The Reality of Solo Game Development - Freerunners Postmortem
- Mar 10, 2026 Freerunners Flow Update
- Mar 4, 2026 Freerunners is Out Now on Steam!
- Feb 10, 2026 QUICK DEV TIP #113 UE5 - Multiple Viewports
- Feb 5, 2026 Zombie Typing is Part of Steam Typing Fest!
- Jan 20, 2026 QUICK DEV TIP #112 UE5 - Copy Paste Functions
-
2025
22
- Dec 30, 2025 QUICK DEV TIP #111 UE5 - Bulk Rename Assets
- Dec 7, 2025 QUICK DEV TIP #110 UE5 - Thicken Trigger Volumes
- Nov 16, 2025 Level Optimise Tool - UE5.7 Compatible Version
- Nov 15, 2025 Project Optimise Tool - UE5.7 Compatible Version
- Nov 5, 2025 Quick Dev Insights #10 - Designing Dynamic Game Music Systems - with Pav Gekko
- Nov 1, 2025 Updated My Website Look!
- Oct 26, 2025 New Branding!
- Oct 15, 2025 Quick Dev Insights has a new home!
- Oct 13, 2025 Zombie Typing is Live in Steam Next Fest!
- Oct 9, 2025 Quick Dev Insights #09 - Technical Animation In Games - With Liam Lambert
- Oct 4, 2025 Zombie Typing - Demo Released To Steam
- Sep 13, 2025 Zombie Typing - Full Game Announcement!
- Sep 10, 2025 Quick Dev Insights #08 - Designing Sounds For Games - with Ben Ridge
- Aug 13, 2025 LEVEL OPTIMSE TOOL - UE5.6 Compatible Version Released!
- Aug 9, 2025 Project Optimise Tool - Updated to V3.2!
- Aug 7, 2025 QUICK DEV TIP #109 UE5 - Filtering Output Logs
- Jul 23, 2025 QUICK DEV TIP #108 UE5 - Bulk Fill Array
- Jul 23, 2025 QUICK DEV TIP #107 UE5 - Orbit Camera Mode
- Jul 21, 2025 Devumentary: ZOMBIE TYPING
- Jul 15, 2025 Zombie Typing Game Demo Launched!
- Apr 25, 2025 Optimising Your Unreal Engine 5 Project
- Mar 29, 2025 Level Optimise Tool - Released Onto FAB Marketplace
-
2024
20
- Nov 24, 2024 Project Optimise Tool Released Onto FAB Unreal Marketplace!
- Oct 12, 2024 I Released Project Optimise V3.1
- Sep 17, 2024 QUICK DEV TIP #106 UE4 / UE5 - Toggle Debug Camera
- Sep 7, 2024 Quick Dev Insights #07 - Developing For The Playdate - Ollie Coe
- Sep 3, 2024 QUICK DEV TIP #105 UE4 / UE5 - Debugging UI With The Widget Reflector
- Sep 3, 2024 QUICK DEV TIP #104 UE4 / UE5 - Quick Select Input Key
- Sep 2, 2024 QUICK DEV TIP #103 UE4 / UE5 - Auto Navigate to Blueprint Error
- Aug 28, 2024 Indie Dev Story is now available on Steam for FREE!
- Aug 20, 2024 Quick Dev Insights #06 - Starting and running your own outsourcing studio - Rob Moody
- Aug 4, 2024 QUICK DEV TIP #102 UE4 / UE5 - List Modified Variables
- Aug 4, 2024 QUICK DEV TIP #101 UE5 - Quick Copy Paste Variables
- Jul 31, 2024 Indie Dev Story Patch Notes for V1.3
- Apr 22, 2024 Testing out Tech: Adobe Express - Animations from Audio
- Apr 20, 2024 Made a new Game: Ultra Ball!
- Mar 5, 2024 FREERUNNERS PROGRESS - More ways to Fail
- Feb 27, 2024 Freerunners Progress - A better flow
- Feb 21, 2024 Freerunners Marketing, Lets get started!
- Feb 17, 2024 FREERUNNERS Steam Next Fest Postmortem
- Feb 7, 2024 FREERUNNERS IS IN STEAM NEXT FEST FEB 2024!
- Jan 25, 2024 FREERUNNERS DEMO UPDATE! (JANUARY 2024)
-
2023
18
- Dec 31, 2023 Marauders Community Memes, Art and Cosplay! Dec 2023 Edition
- Nov 27, 2023 Freerunners Demo Updates! (November 2023)
- Oct 7, 2023 Project Optimise Tool (Unreal Engine) : How To Use
- Oct 7, 2023 Project Optimise Tool Is Now Downloadable From My itch.io Page
- Sep 8, 2023 Freerunners Demo Out Now!
- Sep 4, 2023 All Things Marauders (March - August 2023)
- Aug 8, 2023 10 Tips For Faster Blueprint Using
- Aug 5, 2023 Updated my Free Unreal Engine Tool: Project Optimise
- Jun 10, 2023 Meetup at the Team17 office!
- Apr 28, 2023 New Unreal Engine Tool: Project Optimise!
- Apr 14, 2023 21 UE4/UE5 Tips To Help You Build Out Levels Faster
- Mar 31, 2023 I did a talk at GDC!
- Mar 4, 2023 4 Material Editor Tips for Unreal Engine
- Feb 25, 2023 6 Tips for Faster Blueprinting!
- Feb 13, 2023 5 Useful Unreal Engine Blueprint Tips/Tricks
- Feb 9, 2023 3 Quick Unreal Engine Sound Tips/Tricks
- Jan 20, 2023 Compare Data tables Tool for Unreal Engine
- Jan 3, 2023 I Tried Rokoko Video - Free Ai Motion Capture
-
2022
55
- Dec 29, 2022 3 Quick Unreal Engine Animation Tips/Tricks
- Dec 21, 2022 Marauders: The Red Baron Update
- Dec 6, 2022 50 Quick Tips and Tricks for Unreal Engine. How many do you know?
- Dec 5, 2022 F1 Marauders Art
- Nov 21, 2022 QUICK DEV TIP #100 UE4 / UE5 - Snap To Surface
- Nov 15, 2022 Quick Dev Insights #02 - Level Designer - Alfie Bawden
- Nov 12, 2022 QUICK DEV TIP #99 UE4 / UE5 - Editor Asset Open Location
- Nov 11, 2022 Launching Marauders into EA
- Nov 11, 2022 Marauders Memes#1
- Nov 7, 2022 QUICK DEV TIP #98 UE4 / UE5 - Custom Asset Shadow
- Oct 29, 2022 QUICK DEV TIP #97 UE4 / UE5 - Screenshots
- Oct 24, 2022 QUICK DEV TIP #96 UE4 / UE5 - Copy Paste UMG Anims
- Oct 16, 2022 QUICK DEV TIP #95 UE4 / UE5 - Favourite Blueprint Nodes
- Oct 12, 2022 Rust bucket 3D Print
- Oct 12, 2022 QUICK DEV TIP #94 UE4 / UE5 - MATERIAL EDITOR KEYBOARD SHORTCUTS
- Sep 27, 2022 QUICK DEV TIP #93 UE4 / UE5 - Blueprint Keyboard Shortcuts
- Sep 19, 2022 QUICK DEV TIP #92 UE4 / UE5 - GAMEPLAY VIEW
- Sep 10, 2022 Marauders Progress
- Sep 3, 2022 QUICK DEV TIP #91 UE4 / UE5 - COMMENTING
- Aug 22, 2022 QUICK DEV TIP #90 UE4 / UE5 - GROUPING
- Aug 15, 2022 QUICK DEV TIP #89 UE4 / UE5 - LOCK IN PLACE
- Aug 5, 2022 QUICK DEV TIP #88 UE4 / UE5 - REORDER ARRAY
- Jul 19, 2022 QUICK DEV TIP #87 UE4 / UE5 - HIDE UI BINDINGS
- Jul 12, 2022 QUICK DEV TIP #86 UE4 / UE5 - CONSOLE COMMAND INFO
- Jul 3, 2022 QUICK DEV TIP #85 UE4 / UE5 - QUICK CHANGE VIEWPORT ANGLE
- Jun 27, 2022 QUICK DEV TIP #84 UE4 / UE5 - DELETE NODE, KEEP CONNECTION
- Jun 19, 2022 QUICK DEV TIP #83 UE4 / UE5 - MOVE WITH ASSET
- Jun 12, 2022 QUICK DEV TIP #82 UE4 / UE5 - EDITOR START UP LEVEL
- Jun 6, 2022 QUICK DEV TIP #81 UE4 / UE5 - VIEW FROM ASSET POINT OF VIEW
- May 29, 2022 QUICK DEV TIP #80 UE4 / UE5 - EXTRA INFO ABOUT NODES
- May 29, 2022 Quick Dev Insights #05 - Indie Games Publisher - Jeff Giasson
- May 23, 2022 QUICK DEV TIP #79 UE4 / UE5 - CONTENT BROWSER FILTERS
- May 16, 2022 QUICK DEV TIP #78 UE4 / UE5 - ADJUST GIZMO SIZE
- May 10, 2022 QUICK DEV TIP #77 UE4 / UE5 - FULL SCREEN VIEWPORT
- May 3, 2022 QUICK DEV TIP #76 UE4 / UE5 - SPEED TREE COLOUR VARIATION NODE
- Apr 28, 2022 Quick Dev Insights #04 - Building A Community - Dan Walters
- Apr 26, 2022 QUICK DEV TIP #74 UE4 / UE5 - OPTIMISING TICK RATE
- Apr 25, 2022 QUICK DEV TIP #75 UE4 / UE5 - MAP THUMBNAIL ICONS
- Apr 12, 2022 QUICK DEV TIP #73 UE4 / UE5 - GPU VISUALISER
- Apr 9, 2022 Quick Dev Insights #03 - Creating UI For Games - Ben Humphreys
- Apr 5, 2022 QUICK DEV TIP #72 UE4 / UE5 - TEMP CHANGE PIVOT
- Mar 28, 2022 QUICK DEV TIP #71 UE4 / UE5 - COPY PASTE LODs
- Mar 24, 2022 Marauders Has Been Announced!
- Mar 22, 2022 QUICK DEV TIP #70 UE4 / UE5 - OUTLINER FILTERING
- Mar 15, 2022 QUICK DEV TIP #69 UE4 / UE5 - CONSOLE COMMAND SEARCHING
- Mar 7, 2022 QUICK DEV TIP #68 UE4 / UE5 - HIGHLIGHTING CONNECTIONS
- Mar 1, 2022 QUICK DEV TIP #67 UE4 / UE5 - SAVE HARD DRIVE SPACE
- Feb 21, 2022 QUICK DEV TIP #66 UE4 / UE5 - NAME MATERIAL PINS
- Feb 15, 2022 QUICK DEV TIP #65 UE4 / UE5 - EDIT AUTOSAVE SETTINGS
- Feb 6, 2022 QUICK DEV TIP #64 UE4 / UE5 - HIDE ALL SCREEN MESSAGES
- Jan 31, 2022 QUICK DEV TIP #63 UE4 / UE5 - MEASURING DISTANCES
- Jan 25, 2022 QUICK DEV TIP #62 UE4 / UE5 - MATHS IN VARIABLES
- Jan 17, 2022 QUICK DEV TIP #61 UE4 / UE5 - STORE BLUEPRINT GRAPH POSITIONS
- Jan 11, 2022 QUICK DEV TIP #60 UE4 / UE5 - MIRROR ASSETS
- Jan 3, 2022 QUICK DEV TIP #59 UE4 / UE5 - SMALLER INTERFACE ICONS
-
2021
55
- Dec 27, 2021 QUICK DEV TIP #58 UE4 / UE5 - QUICK ADJUST CAMERA SPEED
- Dec 20, 2021 QUICK DEV TIP #57 UE4 / UE5 - BREAKPOINT ON BLUEPRINT ERROR
- Dec 13, 2021 QUICK DEV TIP #56 UE4 / UE5 - UMG REPLACE & WRAP WITH
- Dec 6, 2021 QUICK DEV TIP #55 UE4 / UE5 - MOVE VARIABLE TO PARENT
- Nov 29, 2021 QUICK DEV TIP #54 UE4 / UE5 - SELECT ALL OF THE SAME
- Nov 22, 2021 QUICK DEV TIP #53 UE4 / UE5 - LIGHT MAP STATISTICS
- Nov 16, 2021 QUICK DEV TIP #52 UE4 / UE5 - EVENT TO FUNCTION / FUNCTION TO EVENT
- Nov 8, 2021 QUICK DEV TIP #51 UE4 / UE5 - DISABLE BLUEPRINT NODE
- Nov 1, 2021 QUICK DEV TIP #50 UE4 / UE5 - EDITOR CALL EVENTS AT RUNTIME
- Oct 25, 2021 QUICK DEV TIP #49 UE4 / UE5 - SAVE LOAD LAYOUTS
- Oct 18, 2021 QUICK DEV TIP #48 UE4 / UE5 - QUICK MAKE ICONS
- Oct 18, 2021 My steam page got approved for my game Freerunners!
- Oct 11, 2021 QUICK DEV TIP #47 UE4 / UE5 - QUICK OPEN LEVEL ASSET
- Oct 4, 2021 QUICK DEV TIP #46 UE4 / UE5 - THUMBNAIL EDIT MODE
- Sep 27, 2021 QUICK DEV TIP #45 UE4 / UE5 - COMBINING MULTIPLE STATIC MESHES
- Sep 20, 2021 QUICK DEV TIP #44 UE4 / UE5 - RELATIVE AND WORLD TRANSFORMS
- Sep 13, 2021 QUICK DEV TIP #43 UE4 / UE5 - QUICK NAVIGATE TO BLUEPRINT PARENT
- Sep 6, 2021 QUICK DEV TIP #42 UE4 / UE5 - Automatically Reimport Files
- Aug 30, 2021 QUICK DEV TIP #41 UE4 / UE5 - Have Multiple Anim Sequences Open
- Aug 24, 2021 QUICK DEV TIP #40 UE4 / UE5 - Diffing Blueprints
- Aug 16, 2021 QUICK DEV TIP #39 UE4 / UE5 - Quick Tweak Textures
- Aug 9, 2021 QUICK DEV TIP #38 UE4 / UE5 - Animation Pose Into Static Mesh
- Aug 2, 2021 We Won An Award!
- Aug 2, 2021 QUICK DEV TIP #37 UE4 / UE5 - Colourblind Editor Mode
- Jul 26, 2021 QUICK DEV TIP #36 UE4 / UE5 - Saving Colours
- Jul 19, 2021 QUICK DEV TIP #35 UE4 / UE5 - Quick Switch Tabs
- Jul 12, 2021 QUICK DEV TIP #34 UE4 / UE5 - Find Across Whole Project
- Jul 5, 2021 QUICK DEV TIP #33 UE4 / UE5 - UMG Favourites
- Jun 28, 2021 QUICK DEV TIP #32 UE4 - Custom Grid Snap Amounts
- Jun 21, 2021 QUICK DEV TIP #31 UE4 - Favourite Folders
- Jun 13, 2021 QUICK DEV TIP #30 UE4 - Content Browser Icon Size
- Jun 7, 2021 QUICK DEV TIP #29 UE4 - Quick Make Pins
- May 31, 2021 QUICK DEV TIP #28 UE4 - Drop Asset To Surface
- May 24, 2021 QUICK DEV TIP #27 UE4 - Multiple Content Browsers
- May 17, 2021 QUICK DEV TIP #26 UE4 - Change Asset Default Transform
- May 10, 2021 QUICK DEV TIP #25 UE4 - Move Light In Static Mesh Viewer
- May 3, 2021 QUICK DEV TIP #24 UE4 - Quick Rename
- May 3, 2021 Survive Another Night Patch Notes
- Apr 26, 2021 QUICK DEV TIP #23 UE4 - Toggle Translucent Selection
- Apr 19, 2021 QUICK DEV TIP #22 UE4 - Quick Find Asset
- Apr 12, 2021 QUICK DEV TIP #21 UE4 - ADVANCED CONTENT BROWSER SEARCHING
- Apr 5, 2021 QUICK DEV TIP #20 UE4 - OPTIMISING: DUMPTICKS
- Mar 29, 2021 QUICK DEV TIP #19 UE4 - TWEAK ANIMATIONS IN EDITOR
- Mar 22, 2021 QUICK DEV TIP #18 UE4 - SEPARATE LIGHTING CHANNELS
- Mar 15, 2021 QUICK DEV TIP #17 UE4 - MATERIALS QUICK CONNECT
- Mar 8, 2021 QUICK DEV TIP #16 UE4 - PREVIEW AUDIO FROM VIEWPORT
- Mar 1, 2021 QUICK DEV TIP #15 UE4 - BULK EDIT ASSETS
- Feb 22, 2021 QUICK DEV TIP #14 UE4 - QUICK SET SOUND SETTINGS
- Feb 15, 2021 QUICK DEV TIP #13 UE4 - STORED CAMERA POSITIONS
- Feb 8, 2021 QUICK DEV TIP #12 UE4 - BLUEPRINTS - EASY COPY INFO
- Feb 1, 2021 QUICK DEV TIP #11 UE4 - BLUEPRINTS - QUICK IMPORTING FILES
- Jan 25, 2021 QUICK DEV TIP #10 UE4 - BLUEPRINTS - SUBCATEGORIES
- Jan 18, 2021 QUICK DEV TIP #09 UE4 - BLUEPRINTS - COPY COLLISION
- Jan 12, 2021 QUICK DEV TIP #08 UE4 - MULTI-LINE TEXT!
- Jan 5, 2021 Quick Dev Tip #07 UE4 - Coloured Folders!
-
2020
11
- Dec 28, 2020 Quick Dev Tip #06 UE4 - Connection Lines
- Dec 28, 2020 Survive Another Night Postmortem
- Dec 21, 2020 Quick Dev Tip #05 UE4 - Quick Align Nodes
- Dec 16, 2020 Quick Dev Tip #4 UE4 - Reroute Nodes
- Dec 13, 2020 Quick Dev Tip #3 UE4 - Blueprints Quick Variables
- Dec 13, 2020 My 2020 Epic MegaJam Entry
- Nov 30, 2020 Quick Dev Tip #2 UE4 - Blueprints - Pin Splitting
- Nov 24, 2020 New Quick Dev Tips Series
- May 7, 2020 "Marauder" Our New Game
- Apr 12, 2020 Bringing Images To Life
- Apr 11, 2020 VR Fun
-
2019
1
- May 26, 2019 Art'ing
-
2018
2
- Sep 3, 2018 Playing around making a loading icon
- Aug 12, 2018 Showreel of my animations from "The Black Death"
-
2017
8
- Nov 4, 2017 RAGE trailer
- Nov 4, 2017 Made a Trailer for 'Indie Dev Story'
- Oct 25, 2017 Indie Dev Story Patch Notes V1.1 & V1.2
- Sep 22, 2017 The Black Death has been shortlisted for an Award!
- Aug 5, 2017 Rage Postmortem
- Aug 5, 2017 Finished my next game! "Rage"
- Jun 29, 2017 Busy, Busy and The Black Death Progress
- Feb 19, 2017 Gifs of the little games I have made so far!
-
2016
14
- Dec 10, 2016 Indie Dev Story Postmortem
- Dec 4, 2016 Finished 'Indie Dev Story'
- Dec 2, 2016 CBgameDev Logo
- Nov 12, 2016 TBD Hit 80% Woop! & Nottingham Gamecity Festival Talk!
- Oct 8, 2016 The Black Death at EGX 2016!
- Aug 23, 2016 The Black Death at Gamescom, Germany 2016
- Jun 9, 2016 Finished my next mini game
- May 27, 2016 More pixel playing around
- May 18, 2016 The Black Death at Rezzed
- Apr 2, 2016 Boxes animating
- Apr 2, 2016 Recording Lets Play For the Black Death
- Mar 27, 2016 Playing around with pixel art
- Mar 17, 2016 Made a Launcher for my game Jam Games
- Mar 17, 2016 My First Pixel Animation