
How Bad Audio Organisation Was Costing Me Money (And How I Fixed It)
How Bad Audio Organisation Was Costing Me Money (And How I Fixed It)
I recently released my game Freerunners, and while looking back over its development costs, one thing stood out to me: I’d spent a surprising amount of money on audio. Music can for sure get expensive, but a lot of this was sound effects.
I checked a few of my older projects… same story.
I do enjoy recording and creating sound effects, but a lot of the time, I’d just buy a single sound or a pack that was close to what I needed because it was faster. Individually, these don’t seem like big purchases; £2 for a sound, £10 for a pack. However, over a project that lasts multiple years, they can really start to add up.
TL;DR:
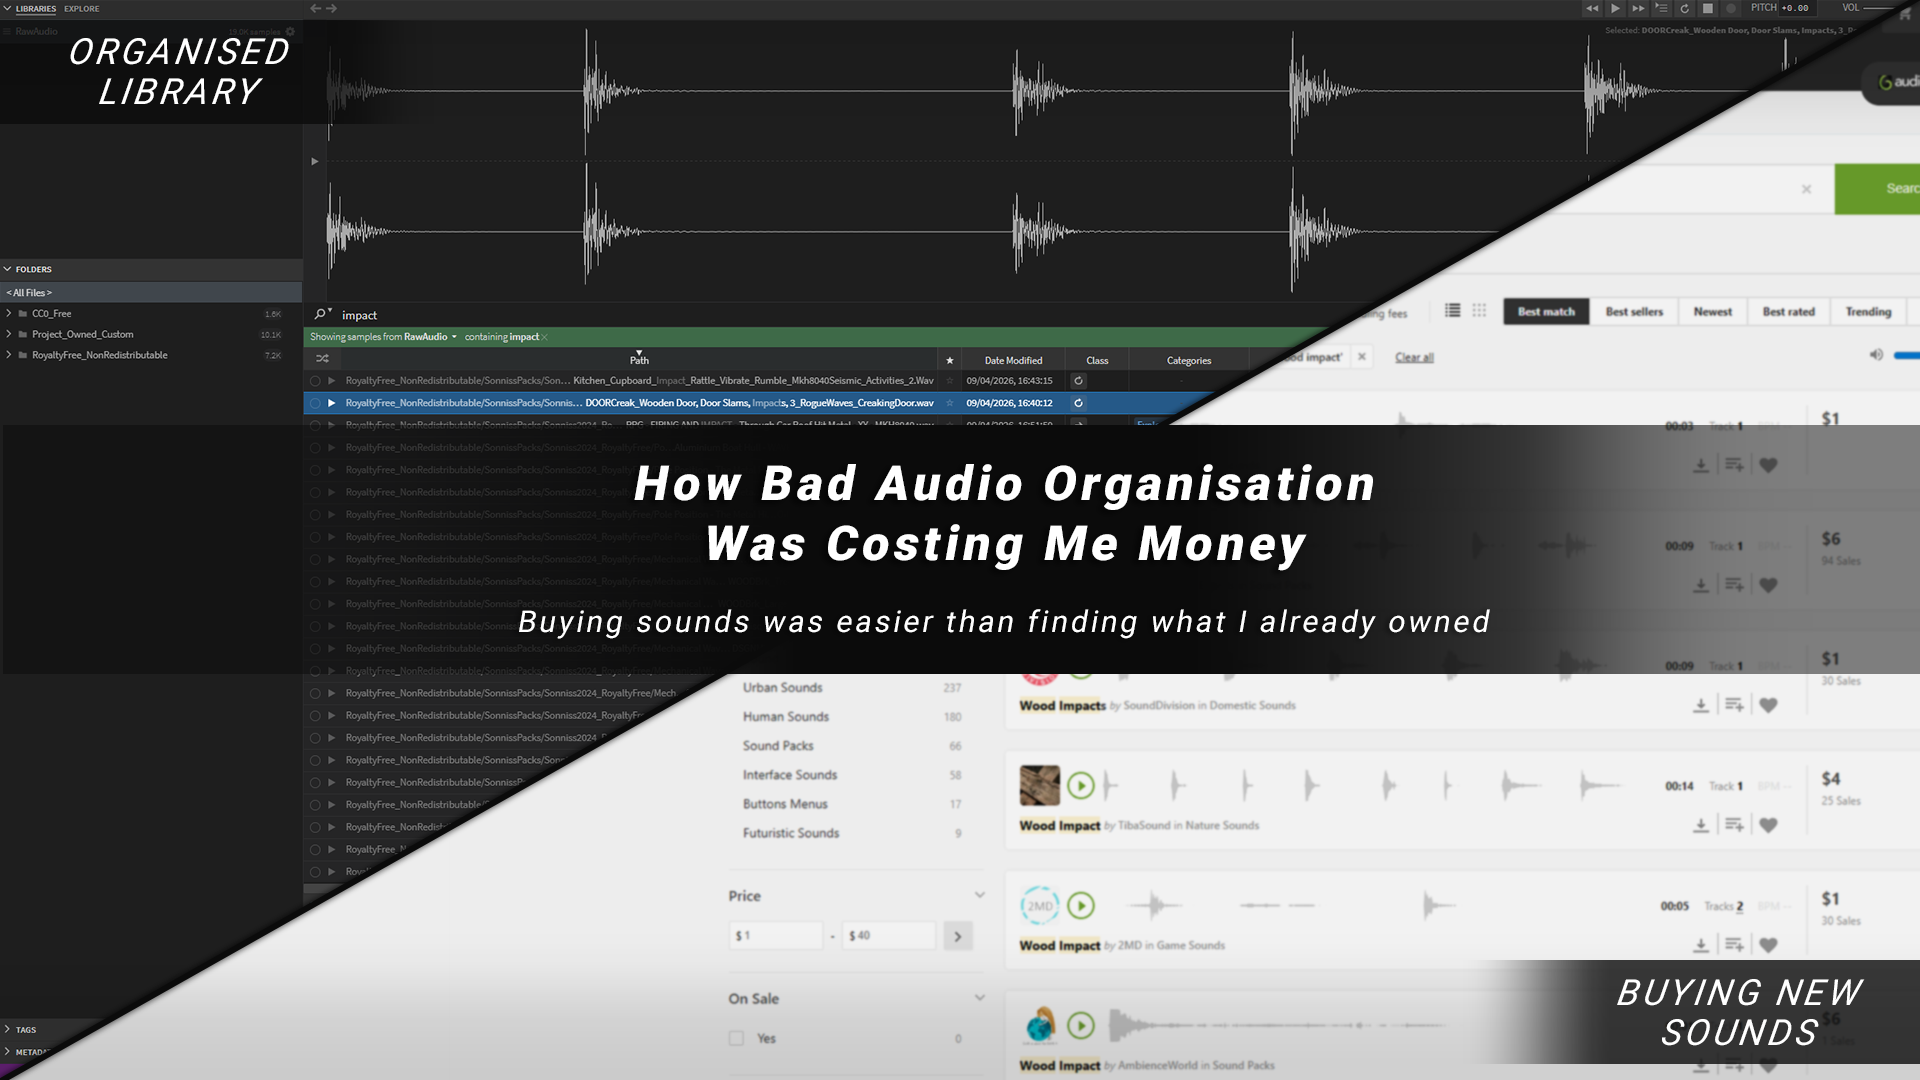
I was wasting money on audio because buying sounds was easier than searching through what I already had
I fixed it by building a simple system: better source audio + licence-based organisation + fast search
Using Sononym made my entire library searchable and easy to preview
Result: faster workflow, less time digging through folders, and fewer unnecessary purchases
The Hidden Cost Of Audio
I recently released my game Freerunners, and while looking back over its development costs, one thing stood out to me: I’d spent a surprising amount of money on audio. Music can for sure get expensive, but a lot of this was sound effects.
I checked a few of my older projects… same story.
I do enjoy recording and creating sound effects, but a lot of the time, I’d just buy a single sound or a pack that was close to what I needed because it was faster. Individually, these don’t seem like big purchases; £2 for a sound, £10 for a pack. However, over a project that lasts multiple years, it can all really start to add up.
Buying Was Faster Than Being Organised
Part of why I kept buying sounds from online libraries and marketplaces was simple: they make it easy. You can search by theme, quickly preview, and get something close to what you need in seconds.

On my end though, it was chaos.
All the audio I’d bought over the years just got dumped into random folders on my PC and slowly disappeared into the black hole of my hard drive. I’d forget what I already had, and I’m pretty sure I’ve bought the same, or very similar, sounds more than once because of it.
I was making things harder for myself. I wasn't necessarily lacking sounds, I just couldn’t find them.
The Problem I Needed To Solve
I’ve worked on audio across a bunch of projects; Solo and small-mid-sized teams, but I am not an audio guy. I’m an Unreal generalist, and I had never given myself the time to build out a proper audio pipeline until now.
As I dug deeper into my audio workflow, I started to see patterns that I could improve. In the book Atomic Habits, the author talks about making positive habits you want to encourage simpler and easier to do, to make you more likely to do them. So with this in mind, I decided this was the problem that I needed to solve:
How can I build a library of high-quality audio that’s organised, easy to browse, and quick to search, so I don’t need to keep buying new sounds?
The goal was simple: spend less time and money hunting for sounds, giving me more time to concentrate on manipulating the sounds into what I needed.
This broke down into three key parts:
High-quality source audio
Better organisation
An easy way to preview and search sounds
Step 1: Start With Better Source Audio
My audio friend once told me that he uses both personal recordings and audio packs / sound libraries, but what really matters to him is the final quality.

Recording everything from scratch takes time, and it’s easy to miss the quality bar when someone else may have already done it to a much higher level. Either way, most sounds end up being manipulated and designed into something unrecognisable, so your time is often better spent working with good source material than creating everything from scratch.
High-quality source audio just makes everything easier, and there’s a huge amount of high-quality, free-to-use audio out there, so that’s where I started when building out my new system.
Here are a few places I used for my initial library pass:
A massive collection of royalty-free sounds (hundreds of gigabytes). Takes a while to download and unzip, but it’s a great foundation.

Free Packs From Professional Audio Sellers
Professional audio sellers like AsoundEffect and Boom library often have free packs or give away free example packs in their newsletters.

Great small packs. Free to download, or you can support Kenny, as I did, by buying the collection of all his asset packs here.

I hadn’t realised before, but there’s a lot of free game audio on itch. It can take a bit of digging, and you need to check licences carefully.

Your Own Custom Sounds
Don’t forget anything you’ve already recorded or created yourself in past projects over the years.

Step 2: Organising My Audio (Licences + Structure)
Considering Licencing
One thing worth keeping in mind is: Audio Licences. Different packs have different rules, so it’s important to understand what you can and can’t do with the specific audio, especially if you’re using it in a commercial game.
Here are some common licence types you might come across:
Royalty-Free - Usually pay once and use in your project (within licence limits)
Commercial Use - Allowed in paid/released games
Attribution Required (CC-BY) - Must credit the creator
Non-Commercial - Not allowed in paid games
Public Domain / CC0 - Free to use, no restrictions
Exclusive vs Non-Exclusive - Only you vs shared usage
Redistribution Restricted - Can’t resell/share raw files (common in asset packs)
A simple way I think about it is:
Can I use this in a commercial game?
Do I need to credit anyone?
Can I redistribute it?
Is this exclusive, or can others use it too?
Designing A Folder Structure
Not the most exciting thing in the world, but super important for the longevity of an organised system.
Before, I had no real folder structure; everything just lived in random places. This time I wanted to be more intentional from the ground up.
Keeping licences in mind, I asked GPT about a structure that would work long term, and ended up settling on something pretty simple: organise everything based on how it can be used.
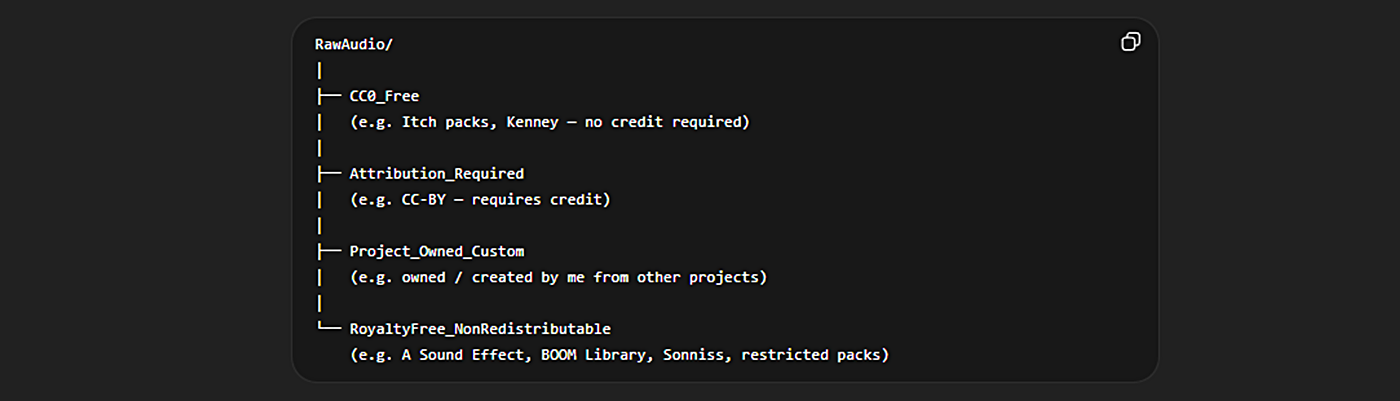
The main idea is just to keep licensing at the heart of the organisation. Grouping audio by licence type, so I always know what I can and can’t do with it.
I also keep a copy of the licence alongside the audio as a text file (most bigger packs include this anyway), so I don’t have to guess later.
I might need to extend this folder structure as I get new audio packs with different licences, so it might still become chaotic over time, but for now, it’s working and doing the job.
Step 3: The Missing Piece - Browsing & Previewing Audio
Now I had good quality audio and a solid structure, but I still had a key piece of the puzzle missing: a fast way to actually find what I needed.
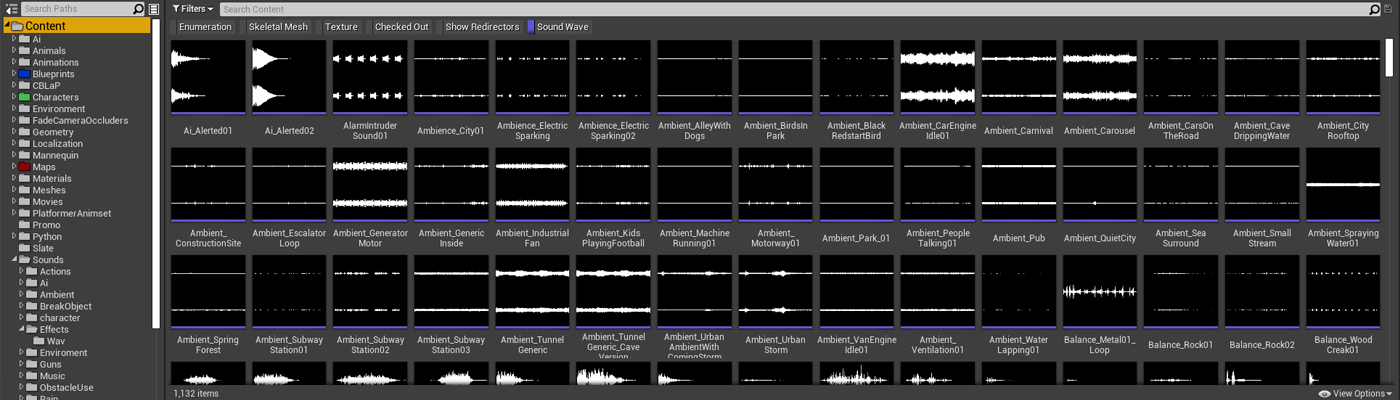
I knew software like Adobe Bridge existed to solve the problem of previewing large amounts of images quickly. So I used that as my starting point, with the aim of finding something similar, but for audio. Below, you can see what Adobe Bridge looks like, to get an idea of what I was after:
I needed a way to keep all my audio in one place and quickly search and preview it, without digging through folders.
I used GPT to explore a few options, then watched some YouTube overview videos to get a feel for what was out there.

Why I Chose Sononym
After looking over a few of the popular choices for sound library management tools, I settled on Sononym.
There were a lot of tools out there, but Sononym stood out because:
Has solid search functionality - tagging, audio analysis, similarity matching, etc.
Free trial and a cheap one-off payment - no subscription plan
Works offline
Here is a quick overview video, showing off what Sononym can do:
Getting Set Up
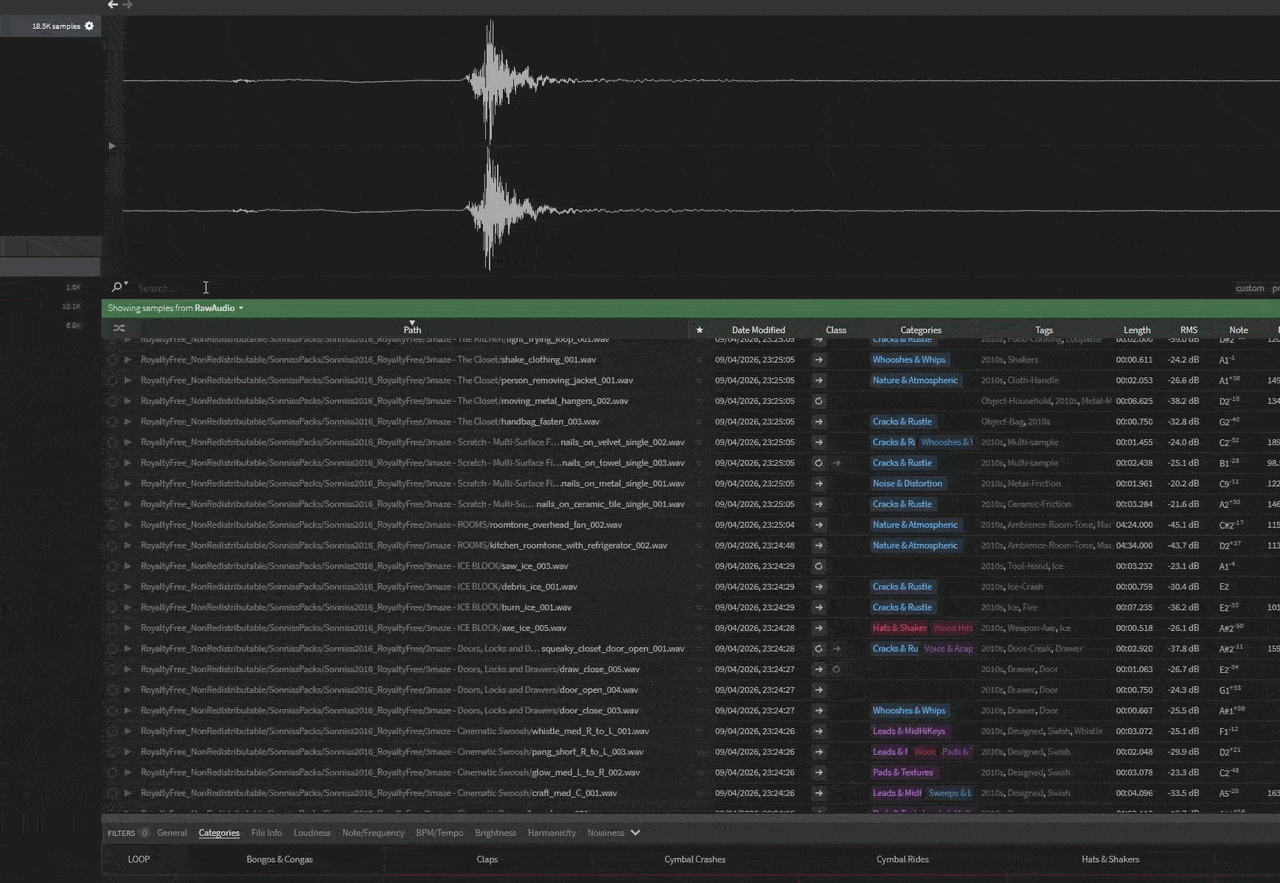
The setup was straightforward. The first time you open it, you point it to your audio folders, and it will run a scan analysing them, automatically mapping the audio and adding tags and categories.
The initial scan took a few hours for me (I had a lot of files), and I definitely noticed my PC slowing down while it was running. If you’re doing a big library, it’s probably best to leave it running overnight, rather than trying to perform the scan while working, as I did.
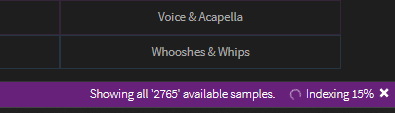
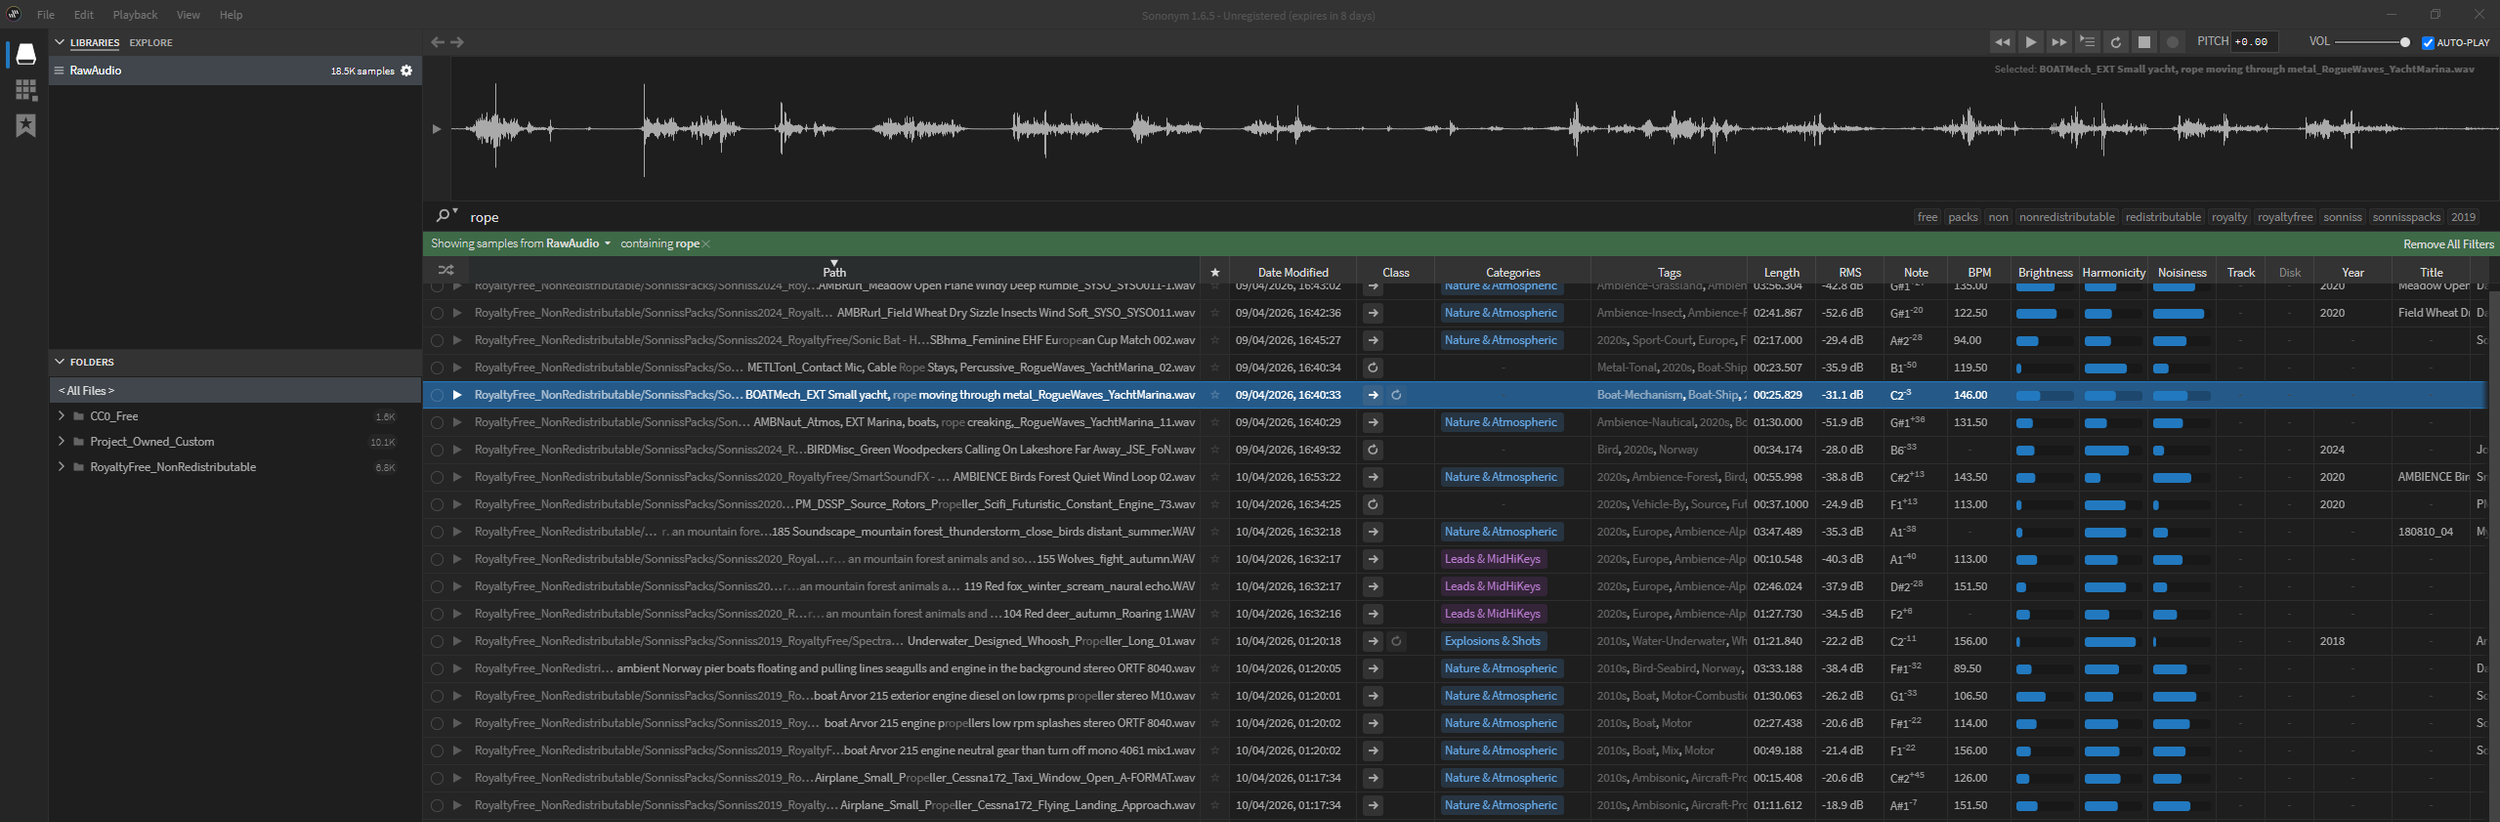
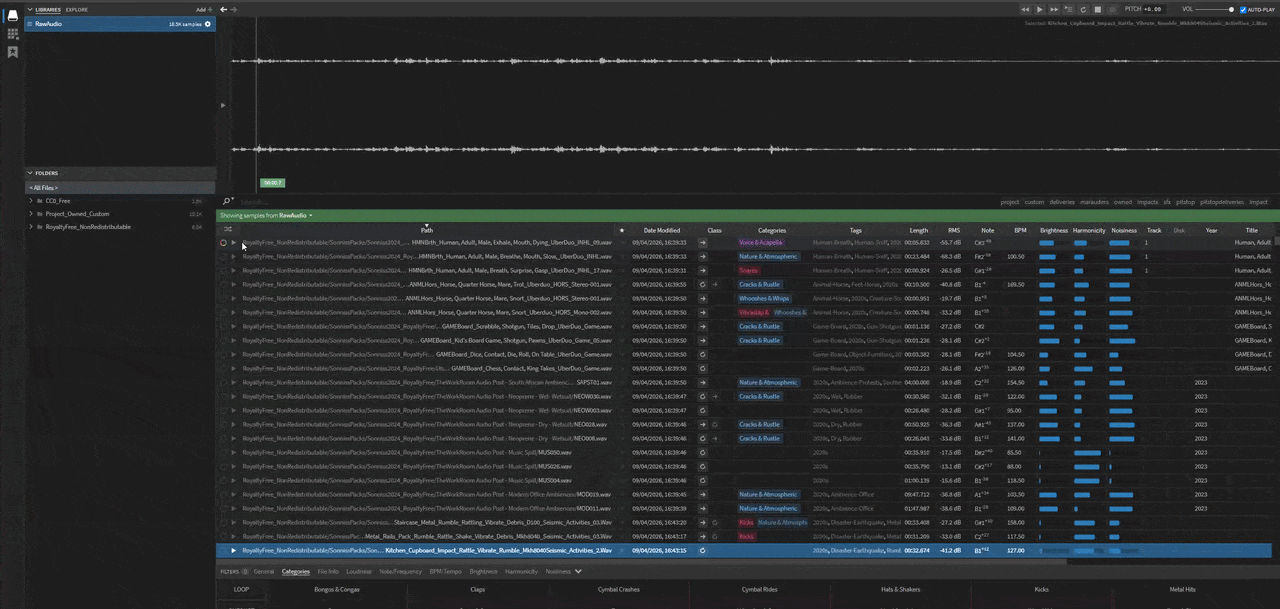
Once it finished, I had a fully searchable library of all my audio in one place.
Instead of digging through folders, I could now just search and preview over 18,500 sounds instantly.
Problem Solved: The End Result
With my new setup, I can do things like:
Search for “Fire”
Instantly get a list of relevant sounds
Quickly preview them to find what I need
Below is a quick example of how fast it is to search and find sounds now:
My Current Pipeline
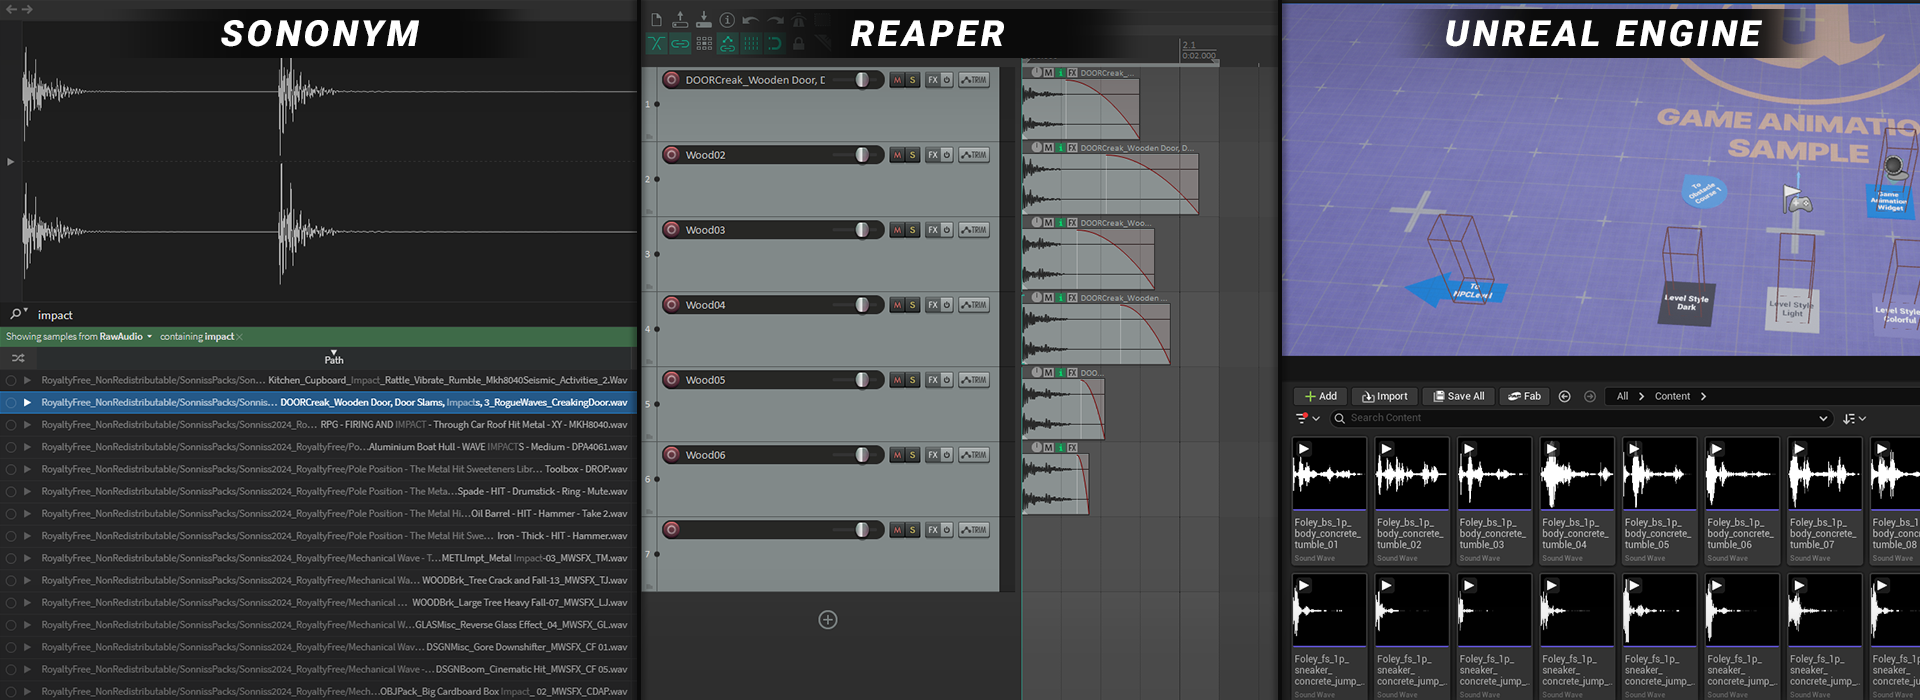
This is what I’ve landed on:
Search in Sononym
Quickly preview and shortlist sounds
Drag straight into Reaper
Tweak as needed
Export and import into Unreal Engine
No digging through folders, no guessing, just search, preview and get to work. Mixing Sononym with the ability to drag straight into Reaper is a pretty deadly combo.
And if I can’t find a suitable sound for what I need in my new setup, then I use this pipeline to add new sounds to my current system:
Find and buy a sound pack
Download it and place it into the appropriate folder (based on licence)
Run an analysis scan in Sononym, so it gets indexed
What I Want To Improve Next
Things are working well at the moment, but there’s still plenty I could improve upon. Here are a few next steps I’m planning:
Move The Library To A Dedicated Hard Drive
The audio library is already taking up a lot of space on my PC, so moving it onto a solid, sturdy, reliable external hard drive is an obvious next step. It’ll free up space and also make it easier to move everything over when I upgrade my PC in the future. One thing I’ll need to figure out is how Sononym stores its analysed data, and make sure that it lives on the drive as well and that I don't lose any custom tags I have added.

Custom Tagging
Sononym already automatically adds tags, but it also lets you add your own. This is something I will do as I work with the library; it will help refine searching even more over time. For example, in the button click UI sound in the screenshot below, I manually added the ‘Analog’ tag to my button click.

Build The Library Over Time
This one’s pretty simple. The more audio I add, the more useful the system becomes. A friend of mine regularly picks up sound packs during sales to build up his library over time, which feels like a solid approach. Signing up for newsletters from audio sellers is a good way to catch those deals.

Wrapping Things Up
I’m really happy with how this all turned out. It’s one of those things I knew, for a long time, I should find a proper solution for, but never wanted to commit the time to. Spending a bit of time up front has already saved me a bunch of time (and probably money).
If you’ve got a growing audio library, I’d definitely recommend setting something like this up. It doesn’t have to be perfect, but having any system is better than none.
I’ll still buy sounds from time to time, but now they actually have a place and a purpose.
Good luck with your audio!
BLOG POSTS
-
2026
8
- 3 May 2026 How Bad Audio Organisation Was Costing Me Money (And How I Fixed It)
- 15 Apr 2026 My Tools Are 30% Off This Week!
- 4 Apr 2026 The Reality of Solo Game Development - Freerunners Postmortem
- 10 Mar 2026 Freerunners Flow Update
- 4 Mar 2026 Freerunners is Out Now on Steam!
- 10 Feb 2026 QUICK DEV TIP #113 UE5 - Multiple Viewports
- 5 Feb 2026 Zombie Typing is Part of Steam Typing Fest!
- 20 Jan 2026 QUICK DEV TIP #112 UE5 - Copy Paste Functions
-
2025
22
- 30 Dec 2025 QUICK DEV TIP #111 UE5 - Bulk Rename Assets
- 7 Dec 2025 QUICK DEV TIP #110 UE5 - Thicken Trigger Volumes
- 16 Nov 2025 Level Optimise Tool - UE5.7 Compatible Version
- 15 Nov 2025 Project Optimise Tool - UE5.7 Compatible Version
- 5 Nov 2025 Quick Dev Insights #10 - Designing Dynamic Game Music Systems - with Pav Gekko
- 1 Nov 2025 Updated My Website Look!
- 26 Oct 2025 New Branding!
- 15 Oct 2025 Quick Dev Insights has a new home!
- 13 Oct 2025 Zombie Typing is Live in Steam Next Fest!
- 9 Oct 2025 Quick Dev Insights #09 - Technical Animation In Games - With Liam Lambert
- 4 Oct 2025 Zombie Typing - Demo Released To Steam
- 13 Sept 2025 Zombie Typing - Full Game Announcement!
- 10 Sept 2025 Quick Dev Insights #08 - Designing Sounds For Games - with Ben Ridge
- 13 Aug 2025 LEVEL OPTIMSE TOOL - UE5.6 Compatible Version Released!
- 9 Aug 2025 Project Optimise Tool - Updated to V3.2!
- 7 Aug 2025 QUICK DEV TIP #109 UE5 - Filtering Output Logs
- 23 Jul 2025 QUICK DEV TIP #108 UE5 - Bulk Fill Array
- 23 Jul 2025 QUICK DEV TIP #107 UE5 - Orbit Camera Mode
- 21 Jul 2025 Devumentary: ZOMBIE TYPING
- 15 Jul 2025 Zombie Typing Game Demo Launched!
- 25 Apr 2025 Optimising Your Unreal Engine 5 Project
- 29 Mar 2025 Level Optimise Tool - Released Onto FAB Marketplace
-
2024
20
- 24 Nov 2024 Project Optimise Tool Released Onto FAB Unreal Marketplace!
- 12 Oct 2024 I Released Project Optimise V3.1
- 17 Sept 2024 QUICK DEV TIP #106 UE4 / UE5 - Toggle Debug Camera
- 7 Sept 2024 Quick Dev Insights #07 - Developing For The Playdate - Ollie Coe
- 3 Sept 2024 QUICK DEV TIP #105 UE4 / UE5 - Debugging UI With The Widget Reflector
- 3 Sept 2024 QUICK DEV TIP #104 UE4 / UE5 - Quick Select Input Key
- 2 Sept 2024 QUICK DEV TIP #103 UE4 / UE5 - Auto Navigate to Blueprint Error
- 28 Aug 2024 Indie Dev Story is now available on Steam for FREE!
- 20 Aug 2024 Quick Dev Insights #06 - Starting and running your own outsourcing studio - Rob Moody
- 4 Aug 2024 QUICK DEV TIP #102 UE4 / UE5 - List Modified Variables
- 4 Aug 2024 QUICK DEV TIP #101 UE5 - Quick Copy Paste Variables
- 31 Jul 2024 Indie Dev Story Patch Notes for V1.3
- 22 Apr 2024 Testing out Tech: Adobe Express - Animations from Audio
- 20 Apr 2024 Made a new Game: Ultra Ball!
- 5 Mar 2024 FREERUNNERS PROGRESS - More ways to Fail
- 27 Feb 2024 Freerunners Progress - A better flow
- 21 Feb 2024 Freerunners Marketing, Lets get started!
- 17 Feb 2024 FREERUNNERS Steam Next Fest Postmortem
- 7 Feb 2024 FREERUNNERS IS IN STEAM NEXT FEST FEB 2024!
- 25 Jan 2024 FREERUNNERS DEMO UPDATE! (JANUARY 2024)
-
2023
18
- 31 Dec 2023 Marauders Community Memes, Art and Cosplay! Dec 2023 Edition
- 27 Nov 2023 Freerunners Demo Updates! (November 2023)
- 7 Oct 2023 Project Optimise Tool (Unreal Engine) : How To Use
- 7 Oct 2023 Project Optimise Tool Is Now Downloadable From My itch.io Page
- 8 Sept 2023 Freerunners Demo Out Now!
- 4 Sept 2023 All Things Marauders (March - August 2023)
- 8 Aug 2023 10 Tips For Faster Blueprint Using
- 5 Aug 2023 Updated my Free Unreal Engine Tool: Project Optimise
- 10 Jun 2023 Meetup at the Team17 office!
- 28 Apr 2023 New Unreal Engine Tool: Project Optimise!
- 14 Apr 2023 21 UE4/UE5 Tips To Help You Build Out Levels Faster
- 31 Mar 2023 I did a talk at GDC!
- 4 Mar 2023 4 Material Editor Tips for Unreal Engine
- 25 Feb 2023 6 Tips for Faster Blueprinting!
- 13 Feb 2023 5 Useful Unreal Engine Blueprint Tips/Tricks
- 9 Feb 2023 3 Quick Unreal Engine Sound Tips/Tricks
- 20 Jan 2023 Compare Data tables Tool for Unreal Engine
- 3 Jan 2023 I Tried Rokoko Video - Free Ai Motion Capture
-
2022
55
- 29 Dec 2022 3 Quick Unreal Engine Animation Tips/Tricks
- 21 Dec 2022 Marauders: The Red Baron Update
- 6 Dec 2022 50 Quick Tips and Tricks for Unreal Engine. How many do you know?
- 5 Dec 2022 F1 Marauders Art
- 21 Nov 2022 QUICK DEV TIP #100 UE4 / UE5 - Snap To Surface
- 15 Nov 2022 Quick Dev Insights #02 - Level Designer - Alfie Bawden
- 12 Nov 2022 QUICK DEV TIP #99 UE4 / UE5 - Editor Asset Open Location
- 11 Nov 2022 Launching Marauders into EA
- 11 Nov 2022 Marauders Memes#1
- 7 Nov 2022 QUICK DEV TIP #98 UE4 / UE5 - Custom Asset Shadow
- 29 Oct 2022 QUICK DEV TIP #97 UE4 / UE5 - Screenshots
- 24 Oct 2022 QUICK DEV TIP #96 UE4 / UE5 - Copy Paste UMG Anims
- 16 Oct 2022 QUICK DEV TIP #95 UE4 / UE5 - Favourite Blueprint Nodes
- 12 Oct 2022 Rust bucket 3D Print
- 12 Oct 2022 QUICK DEV TIP #94 UE4 / UE5 - MATERIAL EDITOR KEYBOARD SHORTCUTS
- 27 Sept 2022 QUICK DEV TIP #93 UE4 / UE5 - Blueprint Keyboard Shortcuts
- 19 Sept 2022 QUICK DEV TIP #92 UE4 / UE5 - GAMEPLAY VIEW
- 10 Sept 2022 Marauders Progress
- 3 Sept 2022 QUICK DEV TIP #91 UE4 / UE5 - COMMENTING
- 22 Aug 2022 QUICK DEV TIP #90 UE4 / UE5 - GROUPING
- 15 Aug 2022 QUICK DEV TIP #89 UE4 / UE5 - LOCK IN PLACE
- 5 Aug 2022 QUICK DEV TIP #88 UE4 / UE5 - REORDER ARRAY
- 19 Jul 2022 QUICK DEV TIP #87 UE4 / UE5 - HIDE UI BINDINGS
- 12 Jul 2022 QUICK DEV TIP #86 UE4 / UE5 - CONSOLE COMMAND INFO
- 3 Jul 2022 QUICK DEV TIP #85 UE4 / UE5 - QUICK CHANGE VIEWPORT ANGLE
- 27 Jun 2022 QUICK DEV TIP #84 UE4 / UE5 - DELETE NODE, KEEP CONNECTION
- 19 Jun 2022 QUICK DEV TIP #83 UE4 / UE5 - MOVE WITH ASSET
- 12 Jun 2022 QUICK DEV TIP #82 UE4 / UE5 - EDITOR START UP LEVEL
- 6 Jun 2022 QUICK DEV TIP #81 UE4 / UE5 - VIEW FROM ASSET POINT OF VIEW
- 29 May 2022 QUICK DEV TIP #80 UE4 / UE5 - EXTRA INFO ABOUT NODES
- 29 May 2022 Quick Dev Insights #05 - Indie Games Publisher - Jeff Giasson
- 23 May 2022 QUICK DEV TIP #79 UE4 / UE5 - CONTENT BROWSER FILTERS
- 16 May 2022 QUICK DEV TIP #78 UE4 / UE5 - ADJUST GIZMO SIZE
- 10 May 2022 QUICK DEV TIP #77 UE4 / UE5 - FULL SCREEN VIEWPORT
- 3 May 2022 QUICK DEV TIP #76 UE4 / UE5 - SPEED TREE COLOUR VARIATION NODE
- 28 Apr 2022 Quick Dev Insights #04 - Building A Community - Dan Walters
- 26 Apr 2022 QUICK DEV TIP #74 UE4 / UE5 - OPTIMISING TICK RATE
- 25 Apr 2022 QUICK DEV TIP #75 UE4 / UE5 - MAP THUMBNAIL ICONS
- 12 Apr 2022 QUICK DEV TIP #73 UE4 / UE5 - GPU VISUALISER
- 9 Apr 2022 Quick Dev Insights #03 - Creating UI For Games - Ben Humphreys
- 5 Apr 2022 QUICK DEV TIP #72 UE4 / UE5 - TEMP CHANGE PIVOT
- 28 Mar 2022 QUICK DEV TIP #71 UE4 / UE5 - COPY PASTE LODs
- 24 Mar 2022 Marauders Has Been Announced!
- 22 Mar 2022 QUICK DEV TIP #70 UE4 / UE5 - OUTLINER FILTERING
- 15 Mar 2022 QUICK DEV TIP #69 UE4 / UE5 - CONSOLE COMMAND SEARCHING
- 7 Mar 2022 QUICK DEV TIP #68 UE4 / UE5 - HIGHLIGHTING CONNECTIONS
- 1 Mar 2022 QUICK DEV TIP #67 UE4 / UE5 - SAVE HARD DRIVE SPACE
- 21 Feb 2022 QUICK DEV TIP #66 UE4 / UE5 - NAME MATERIAL PINS
- 15 Feb 2022 QUICK DEV TIP #65 UE4 / UE5 - EDIT AUTOSAVE SETTINGS
- 6 Feb 2022 QUICK DEV TIP #64 UE4 / UE5 - HIDE ALL SCREEN MESSAGES
- 31 Jan 2022 QUICK DEV TIP #63 UE4 / UE5 - MEASURING DISTANCES
- 25 Jan 2022 QUICK DEV TIP #62 UE4 / UE5 - MATHS IN VARIABLES
- 17 Jan 2022 QUICK DEV TIP #61 UE4 / UE5 - STORE BLUEPRINT GRAPH POSITIONS
- 11 Jan 2022 QUICK DEV TIP #60 UE4 / UE5 - MIRROR ASSETS
- 3 Jan 2022 QUICK DEV TIP #59 UE4 / UE5 - SMALLER INTERFACE ICONS
-
2021
55
- 27 Dec 2021 QUICK DEV TIP #58 UE4 / UE5 - QUICK ADJUST CAMERA SPEED
- 20 Dec 2021 QUICK DEV TIP #57 UE4 / UE5 - BREAKPOINT ON BLUEPRINT ERROR
- 13 Dec 2021 QUICK DEV TIP #56 UE4 / UE5 - UMG REPLACE & WRAP WITH
- 6 Dec 2021 QUICK DEV TIP #55 UE4 / UE5 - MOVE VARIABLE TO PARENT
- 29 Nov 2021 QUICK DEV TIP #54 UE4 / UE5 - SELECT ALL OF THE SAME
- 22 Nov 2021 QUICK DEV TIP #53 UE4 / UE5 - LIGHT MAP STATISTICS
- 16 Nov 2021 QUICK DEV TIP #52 UE4 / UE5 - EVENT TO FUNCTION / FUNCTION TO EVENT
- 8 Nov 2021 QUICK DEV TIP #51 UE4 / UE5 - DISABLE BLUEPRINT NODE
- 1 Nov 2021 QUICK DEV TIP #50 UE4 / UE5 - EDITOR CALL EVENTS AT RUNTIME
- 25 Oct 2021 QUICK DEV TIP #49 UE4 / UE5 - SAVE LOAD LAYOUTS
- 18 Oct 2021 QUICK DEV TIP #48 UE4 / UE5 - QUICK MAKE ICONS
- 18 Oct 2021 My steam page got approved for my game Freerunners!
- 11 Oct 2021 QUICK DEV TIP #47 UE4 / UE5 - QUICK OPEN LEVEL ASSET
- 4 Oct 2021 QUICK DEV TIP #46 UE4 / UE5 - THUMBNAIL EDIT MODE
- 27 Sept 2021 QUICK DEV TIP #45 UE4 / UE5 - COMBINING MULTIPLE STATIC MESHES
- 20 Sept 2021 QUICK DEV TIP #44 UE4 / UE5 - RELATIVE AND WORLD TRANSFORMS
- 13 Sept 2021 QUICK DEV TIP #43 UE4 / UE5 - QUICK NAVIGATE TO BLUEPRINT PARENT
- 6 Sept 2021 QUICK DEV TIP #42 UE4 / UE5 - Automatically Reimport Files
- 30 Aug 2021 QUICK DEV TIP #41 UE4 / UE5 - Have Multiple Anim Sequences Open
- 24 Aug 2021 QUICK DEV TIP #40 UE4 / UE5 - Diffing Blueprints
- 16 Aug 2021 QUICK DEV TIP #39 UE4 / UE5 - Quick Tweak Textures
- 9 Aug 2021 QUICK DEV TIP #38 UE4 / UE5 - Animation Pose Into Static Mesh
- 2 Aug 2021 We Won An Award!
- 2 Aug 2021 QUICK DEV TIP #37 UE4 / UE5 - Colourblind Editor Mode
- 26 Jul 2021 QUICK DEV TIP #36 UE4 / UE5 - Saving Colours
- 19 Jul 2021 QUICK DEV TIP #35 UE4 / UE5 - Quick Switch Tabs
- 12 Jul 2021 QUICK DEV TIP #34 UE4 / UE5 - Find Across Whole Project
- 5 Jul 2021 QUICK DEV TIP #33 UE4 / UE5 - UMG Favourites
- 28 Jun 2021 QUICK DEV TIP #32 UE4 - Custom Grid Snap Amounts
- 21 Jun 2021 QUICK DEV TIP #31 UE4 - Favourite Folders
- 13 Jun 2021 QUICK DEV TIP #30 UE4 - Content Browser Icon Size
- 7 Jun 2021 QUICK DEV TIP #29 UE4 - Quick Make Pins
- 31 May 2021 QUICK DEV TIP #28 UE4 - Drop Asset To Surface
- 24 May 2021 QUICK DEV TIP #27 UE4 - Multiple Content Browsers
- 17 May 2021 QUICK DEV TIP #26 UE4 - Change Asset Default Transform
- 10 May 2021 QUICK DEV TIP #25 UE4 - Move Light In Static Mesh Viewer
- 3 May 2021 QUICK DEV TIP #24 UE4 - Quick Rename
- 3 May 2021 Survive Another Night Patch Notes
- 26 Apr 2021 QUICK DEV TIP #23 UE4 - Toggle Translucent Selection
- 19 Apr 2021 QUICK DEV TIP #22 UE4 - Quick Find Asset
- 12 Apr 2021 QUICK DEV TIP #21 UE4 - ADVANCED CONTENT BROWSER SEARCHING
- 5 Apr 2021 QUICK DEV TIP #20 UE4 - OPTIMISING: DUMPTICKS
- 29 Mar 2021 QUICK DEV TIP #19 UE4 - TWEAK ANIMATIONS IN EDITOR
- 22 Mar 2021 QUICK DEV TIP #18 UE4 - SEPARATE LIGHTING CHANNELS
- 15 Mar 2021 QUICK DEV TIP #17 UE4 - MATERIALS QUICK CONNECT
- 8 Mar 2021 QUICK DEV TIP #16 UE4 - PREVIEW AUDIO FROM VIEWPORT
- 1 Mar 2021 QUICK DEV TIP #15 UE4 - BULK EDIT ASSETS
- 22 Feb 2021 QUICK DEV TIP #14 UE4 - QUICK SET SOUND SETTINGS
- 15 Feb 2021 QUICK DEV TIP #13 UE4 - STORED CAMERA POSITIONS
- 8 Feb 2021 QUICK DEV TIP #12 UE4 - BLUEPRINTS - EASY COPY INFO
- 1 Feb 2021 QUICK DEV TIP #11 UE4 - BLUEPRINTS - QUICK IMPORTING FILES
- 25 Jan 2021 QUICK DEV TIP #10 UE4 - BLUEPRINTS - SUBCATEGORIES
- 18 Jan 2021 QUICK DEV TIP #09 UE4 - BLUEPRINTS - COPY COLLISION
- 12 Jan 2021 QUICK DEV TIP #08 UE4 - MULTI-LINE TEXT!
- 5 Jan 2021 Quick Dev Tip #07 UE4 - Coloured Folders!
-
2020
11
- 28 Dec 2020 Quick Dev Tip #06 UE4 - Connection Lines
- 28 Dec 2020 Survive Another Night Postmortem
- 21 Dec 2020 Quick Dev Tip #05 UE4 - Quick Align Nodes
- 16 Dec 2020 Quick Dev Tip #4 UE4 - Reroute Nodes
- 13 Dec 2020 Quick Dev Tip #3 UE4 - Blueprints Quick Variables
- 13 Dec 2020 My 2020 Epic MegaJam Entry
- 30 Nov 2020 Quick Dev Tip #2 UE4 - Blueprints - Pin Splitting
- 24 Nov 2020 New Quick Dev Tips Series
- 7 May 2020 "Marauder" Our New Game
- 12 Apr 2020 Bringing Images To Life
- 11 Apr 2020 VR Fun
-
2019
1
- 26 May 2019 Art'ing
-
2018
2
- 3 Sept 2018 Playing around making a loading icon
- 12 Aug 2018 Showreel of my animations from "The Black Death"
-
2017
8
- 4 Nov 2017 RAGE trailer
- 4 Nov 2017 Made a Trailer for 'Indie Dev Story'
- 25 Oct 2017 Indie Dev Story Patch Notes V1.1 & V1.2
- 22 Sept 2017 The Black Death has been shortlisted for an Award!
- 5 Aug 2017 Rage Postmortem
- 5 Aug 2017 Finished my next game! "Rage"
- 29 Jun 2017 Busy, Busy and The Black Death Progress
- 19 Feb 2017 Gifs of the little games I have made so far!
-
2016
14
- 10 Dec 2016 Indie Dev Story Postmortem
- 4 Dec 2016 Finished 'Indie Dev Story'
- 2 Dec 2016 CBgameDev Logo
- 12 Nov 2016 TBD Hit 80% Woop! & Nottingham Gamecity Festival Talk!
- 8 Oct 2016 The Black Death at EGX 2016!
- 23 Aug 2016 The Black Death at Gamescom, Germany 2016
- 9 Jun 2016 Finished my next mini game
- 27 May 2016 More pixel playing around
- 18 May 2016 The Black Death at Rezzed
- 2 Apr 2016 Boxes animating
- 2 Apr 2016 Recording Lets Play For the Black Death
- 27 Mar 2016 Playing around with pixel art
- 17 Mar 2016 Made a Launcher for my game Jam Games
- 17 Mar 2016 My First Pixel Animation